ESP32 arduino reverse engineering
Introduction
The ESP32 is a very popular SoC from Espressif Systems. While Espressif provides the ESP-IDF as its official development framework, most hobbyist projects are built using Arduino, which acts as a higher-level abstraction layer on top of ESP-IDF.
From a reverse-engineering perspective, this abstraction is a double-edged sword. On one hand, Arduino makes development fast and accessible; on the other, it hides the structure of the original program once everything is compiled into a raw flash image with no symbols, no type information, and very little high-level context left.
In this blog post, we’ll walk through a practical, end-to-end workflow for decompiling an Arduino-ESP32 binary using Ghidra, and making sense of what it actually does.
We’ll start from a simple Arduino sketch created specifically for this purpose, compile it ourselves, and then work backwards from the generated firmware. Along the way, we’ll:
- Extract and understand the relevant flash images,
- Generate Function ID signatures from a known ELF,
- Load the stripped binary into Ghidra using a custom ESP32 loader,
- And finally, clean up and fix the decompiler output to recover
app_main(),setup(), andloop().
Although the example firmware is intentionally simple, the techniques shown here apply equally well to real-world ESP32 devices where you only have access to a .bin or a full flash dump and no source code at all.
Step 1: Obtaining the .bin file
In this step we’ll go from a simple Arduino sketch to a .bin flash dump that we want to reverse.
I’ll use:
- arduino-cli to compile the sketch for ESP32, and
- esptool.py to merge and/or read back the flash contents.
All commands below assume Linux.
Example sketch (TX packet every second)
For the rest of the post, I’ll use the following minimal example that configures a CC1101 and sends "Hello world!" every second.
Make sure this code lives in a file named project.ino inside a folder also named project (Arduino requires the sketch file name to match the folder name).
1
2
3
4
5
6
7
8
9
10
11
12
13
14
15
16
17
18
19
20
21
22
23
24
25
26
27
28
29
30
31
32
33
34
35
36
37
38
39
40
41
42
43
44
45
46
47
48
49
50
51
52
53
54
55
56
57
58
59
60
61
62
#include <Arduino.h>
#include <cc1101.h>

// ESP32 SPI + GDO pin mapping
static const uint8_t PIN_CS   = 5;
static const uint8_t PIN_SCK  = 18;
static const uint8_t PIN_MISO = 19;
static const uint8_t PIN_MOSI = 23;
static const uint8_t PIN_GDO0 = 4;
static const uint8_t PIN_GDO2 = 2;

// Create radio object using fully-qualified namespace
CC1101::Radio radio(
  PIN_CS,
  PIN_SCK,
  PIN_MISO,
  PIN_MOSI,
  PIN_GDO0,
  PIN_GDO2
);

void setup() {
  Serial.begin(115200);
  delay(200);
  Serial.println("Initializing CC1101...");

  CC1101::Status status = radio.begin();
  if (status == CC1101::STATUS_CHIP_NOT_FOUND) {
    Serial.println("ERROR: CC1101 chip not found!");
    while (true) {
      delay(1000);
    }
  }

  // Basic radio parameters
  radio.setFrequency(433.92);              // MHz
  radio.setModulation(CC1101::MOD_2FSK);   // enum from library
  radio.setDataRate(10);                   // kbps
  radio.setOutputPower(10);                // dBm

  // Packet-level configuration
  radio.setPacketLengthMode(CC1101::PKT_LEN_MODE_VARIABLE);
  radio.setAddressFilteringMode(CC1101::ADDR_FILTER_MODE_NONE);
  radio.setPreambleLength(64);
  radio.setSyncWord(0xD391);
  radio.setSyncMode(CC1101::SYNC_MODE_16_16);
  radio.setCrc(true);

  Serial.println("CC1101 ready.");
}

void loop() {
  const char msg[] = "Hello world!";
  CC1101::Status st = radio.transmit((uint8_t*)msg, strlen(msg));
  if (st == CC1101::STATUS_OK) {
    Serial.println("Sent: Hello world!");
  } else {
    Serial.print("TX error: ");
    Serial.println((int)st);
  }
  delay(1000);
}
Install arduino-cli
The easiest way to get a build from the command line is with arduino-cli. The official project provides a small install script you can fetch with curl.
From any directory:
1
curl -fsSL https://raw.githubusercontent.com/arduino/arduino-cli/master/install.sh | sh
Configure arduino-cli for ESP32
First, create a default configuration file:
1
arduino-cli config init
To give the ESP32 core more time to download (it’s big, and slow networks will time out), bump the network timeout:
1
arduino-cli config set network.connection_timeout 600s
Now add Espressif’s ESP32 boards index URL:
1
arduino-cli config set board_manager.additional_urls https://espressif.github.io/arduino-esp32/package_esp32_index.json
Update the core index and install the ESP32 core version you want. In this example I’ll use 3.3.4, which, currently, is the lastest one:
1
2
3
arduino-cli core update-index
arduino-cli core install esp32:esp32@3.3.4
arduino-cli core list
After core install finishes, core list should show an entry like esp32:esp32 3.3.4.
Install the CC1101 library
Install
1
2
arduino-cli lib search CC1101
arduino-cli lib install CC1101@1.2.0
Create the project folder and compile for ESP32
Create a project folder and put the sketch inside:
1
2
3
mkdir project
cd project
# create project.ino and paste the sketch from above
Remember: the main sketch file must be named exactly like the folder (
project.inoinsideproject), otherwise Arduino will complain.
Now compile it for a generic ESP32 using the fully-qualified board name (FQBN) esp32:esp32:esp32:
1
2
3
4
5
arduino-cli compile \
  -b esp32:esp32:esp32 \
  --build-property compiler.cpp.extra_flags="" \
  --build-property compiler.c.extra_flags="" \
  -e
After compilation, you should see a directory such as build/esp32.esp32.esp32/ inside your project folder. That directory contains all the build artifacts for that specific board profile.
Understanding the generated files
Inside build/esp32.esp32.esp32/ you should find at least these files:
project.ino.elf
This is the full ELF file produced by the toolchain. It still contains symbols, sections and debug information. We’ll feed this into Ghidra later to build Function ID signatures.project.ino.bin
This is the application image that Arduino would normally flash at offset0x10000with the default partition scheme. This is the main “program” we are interested in reversing.project.ino.bootloader.bin
The ESP32 bootloader binary, typically flashed at offset0x1000.project.ino.partitions.bin
The partition table, typically flashed at offset0x8000. This tells the chip where the app, SPIFFS, NVS, etc. live in flash.
The addresses above (
0x1000,0x8000,0x10000) are the standard ones for the default 4 MB Arduino-ESP32 partition scheme. If a custom partition layout is used, those offsets can change.
Flashing the three binaries separately (reference)
Note: This section is informational. If you already have
project.ino.bin, you can skip ahead to Step 2: Generate Function ID signatures.
If we wanted to flash this firmware to a board from these three files individually, we would use a command similar to:
1
2
3
4
esptool.py --chip esp32 --port /dev/ttyUSB0 --baud 460800 write_flash \
  0x1000  project.ino.bootloader.bin \
  0x8000  project.ino.partitions.bin \
  0x10000 project.ino.bin
This is the “classic” way: tell esptool which file goes at which offset.
Reading back the full flash from a real device
If the target device uses Flash Encryption or Secure Boot, the dumped flash will be encrypted and not directly usable in Ghidra.
If you already have a real ESP32 with unknown firmware on it and you want to reverse what is there (instead of your own compiled code), you can dump the entire flash.
On a 4 MB device, you can do:
1
2
esptool.py --chip esp32 --port /dev/ttyUSB0 --baud 460800 \
  read_flash 0x0 0x400000 full_flash.bin
0x0is the start address in flash.0x400000is the size (4 MB in hex).full_flash.binis the output file.
Extracting project.ino.bin (app image) from a full flash dump
If you already have a full dump (e.g. full_flash.bin), you can recover the application image by:
1) Extracting + printing the partition table from the dump
2) Using the reported app partition Offset and Size to carve out the app image
You can download gen_esp32part.py from the Arduino-ESP32 GitHub repository..
1
2
3
4
5
6
# 1) Extract partition table (ESP32 default partition table location)
esptool.py --chip esp32 image_info full_flash.bin 2>/dev/null || true
dd if=full_flash.bin of=partition-table.bin bs=1 skip=$((0x8000)) count=$((0x1000)) status=none

# Print it (gen_esp32part.py ships with ESP-IDF; Arduino-ESP32 bundles it too)
python3 gen_esp32part.py partition-table.bin
Look for the row whose Type/SubType is app/factory or app/ota_0 (etc.) and note its Offset and Size.
Output example:
1
2
3
4
5
6
7
8
9
10
Parsing binary partition input...
Verifying table...
# ESP-IDF Partition Table
# Name, Type, SubType, Offset, Size, Flags
nvs,data,nvs,0x9000,20K,
otadata,data,ota,0xe000,8K,
app0,app,ota_0,0x10000,1280K,
app1,app,ota_1,0x150000,1280K,
spiffs,data,spiffs,0x290000,1408K,
coredump,data,coredump,0x3f0000,64K,
Then carve the app image out:
1
2
3
4
5
# 2) Replace these with the Offset/Size you saw above
APP_OFFSET=0x10000
APP_SIZE=0x140000 # 1280K * 1024

dd if=full_flash.bin of=project.ino.bin bs=1 skip=$((APP_OFFSET)) count=$((APP_SIZE)) status=none
You can sanity-check the extracted image, which tells you the project name which should be arduino-lib-builder and the esp-idf version used:
1
esptool.py --chip esp32 image-info project.ino.bin
Output:
1
2
3
4
5
6
7
8
9
10
11
12
13
14
15
16
17
18
19
20
21
22
23
24
25
26
27
28
29
30
31
32
33
34
35
36
37
38
39
40
41
42
43
44
45
46
47
esptool v5.1.0
Image size: 292144 bytes

ESP32 Image Header
==================
Image version: 1
Entry point: 0x40081a88
Segments: 6
Flash size: 4MB
Flash freq: 80m
Flash mode: DIO

ESP32 Extended Image Header
===========================
WP pin: 0xee (disabled)
Flash pins drive settings: clk_drv: 0x0, q_drv: 0x0, d_drv: 0x0, cs0_drv: 0x0, hd_drv: 0x0, wp_drv: 0x0
Chip ID: 0 (ESP32)
Minimal chip revision: v0.0, (legacy min_rev = 0)
Maximal chip revision: v655.35

Segments Information
====================
Segment   Length   Load addr   File offs  Memory types
-------  -------  ----------  ----------  ------------
      0  0x125d8  0x3f400020  0x00000018  DROM
      1  0x03d10  0x3ffbdb60  0x000125f8  BYTE_ACCESSIBLE, DRAM
      2  0x09d00  0x40080000  0x00016310  IRAM
      3  0x21c7c  0x400d0020  0x00020018  IROM
      4  0x0583c  0x40089d00  0x00041c9c  IRAM
      5  0x00020  0x50000200  0x000474e0  RTC_DATA

ESP32 Image Footer
==================
Checksum: 0x83 (valid)
Validation hash: cbb2b1d92950fb5adbad102eef8b63c37051f55eda6e06d130c67ca5ce28ffc9 (valid)

Application Information
=======================
Project name: arduino-lib-builder
App version: 45c1b25
Compile time: Nov 12 2025 10:16:30
ELF file SHA256: 1fdb7a5d3ed57dfd02e7f0409f9693586d67bf2660360b8b1793bc7ba6fc47df
ESP-IDF: v5.5.1-710-g8410210c9a
Minimal eFuse block revision: 0.0
Maximal eFuse block revision: 0.99
MMU page size: 64 KB
Secure version: 0
Getting the Arduino-ESP32 version
You can often recover the exact Arduino-ESP32 core version used to build the firmware by inspecting strings embedded in the full flash dump:
1
strings full_flash.bin | grep arduino
If the firmware was built with Arduino-ESP32, you’ll typically see paths like:
1
/home/victor/.arduino15/packages/esp32/hardware/esp32/3.3.4/cores/esp32/esp32-hal-uart.c
The directory name (hardware/esp32/**3.3.4**/) directly reveals the Arduino-ESP32 version used during compilation. The version is 3.3.4 in this case.
Step 2: Generate Function ID signatures
When the ESP32 ELF file is converted into a .bin, all symbols (function and variable names) are stripped out, leaving only raw machine code. The good news is that most SDK functions compile to the same bytecode across builds—especially when using the same toolchain. This lets us generate “signatures” for known functions from our ELF, and later use those signatures to identify and rename the same functions inside an unknown binary.
In our case, project.elf will be used to generate the signatures, and project.bin will be the stripped file we’ll decompile. If you’re reversing some random firmware, you obviously won’t have access to the original source, so you’ll need to create a dummy project that includes the same libraries (or as many of them as possible). Compiling that dummy project will give you an ELF suitable for generating signatures.
Creating Function ID signatures
This video by 0x6d696368 does a great job explaining how signature generation works. It’s only four minutes long, and lets be honest, I doubt I could explain it better myself.
Tip: Create a signatures folder inside your Ghidra project as you can only select folders for Function ID generation. This is where you’ll drop the ELF files you want to generate .fidb signatures from.
Example parameters for creating Function ID signatures:
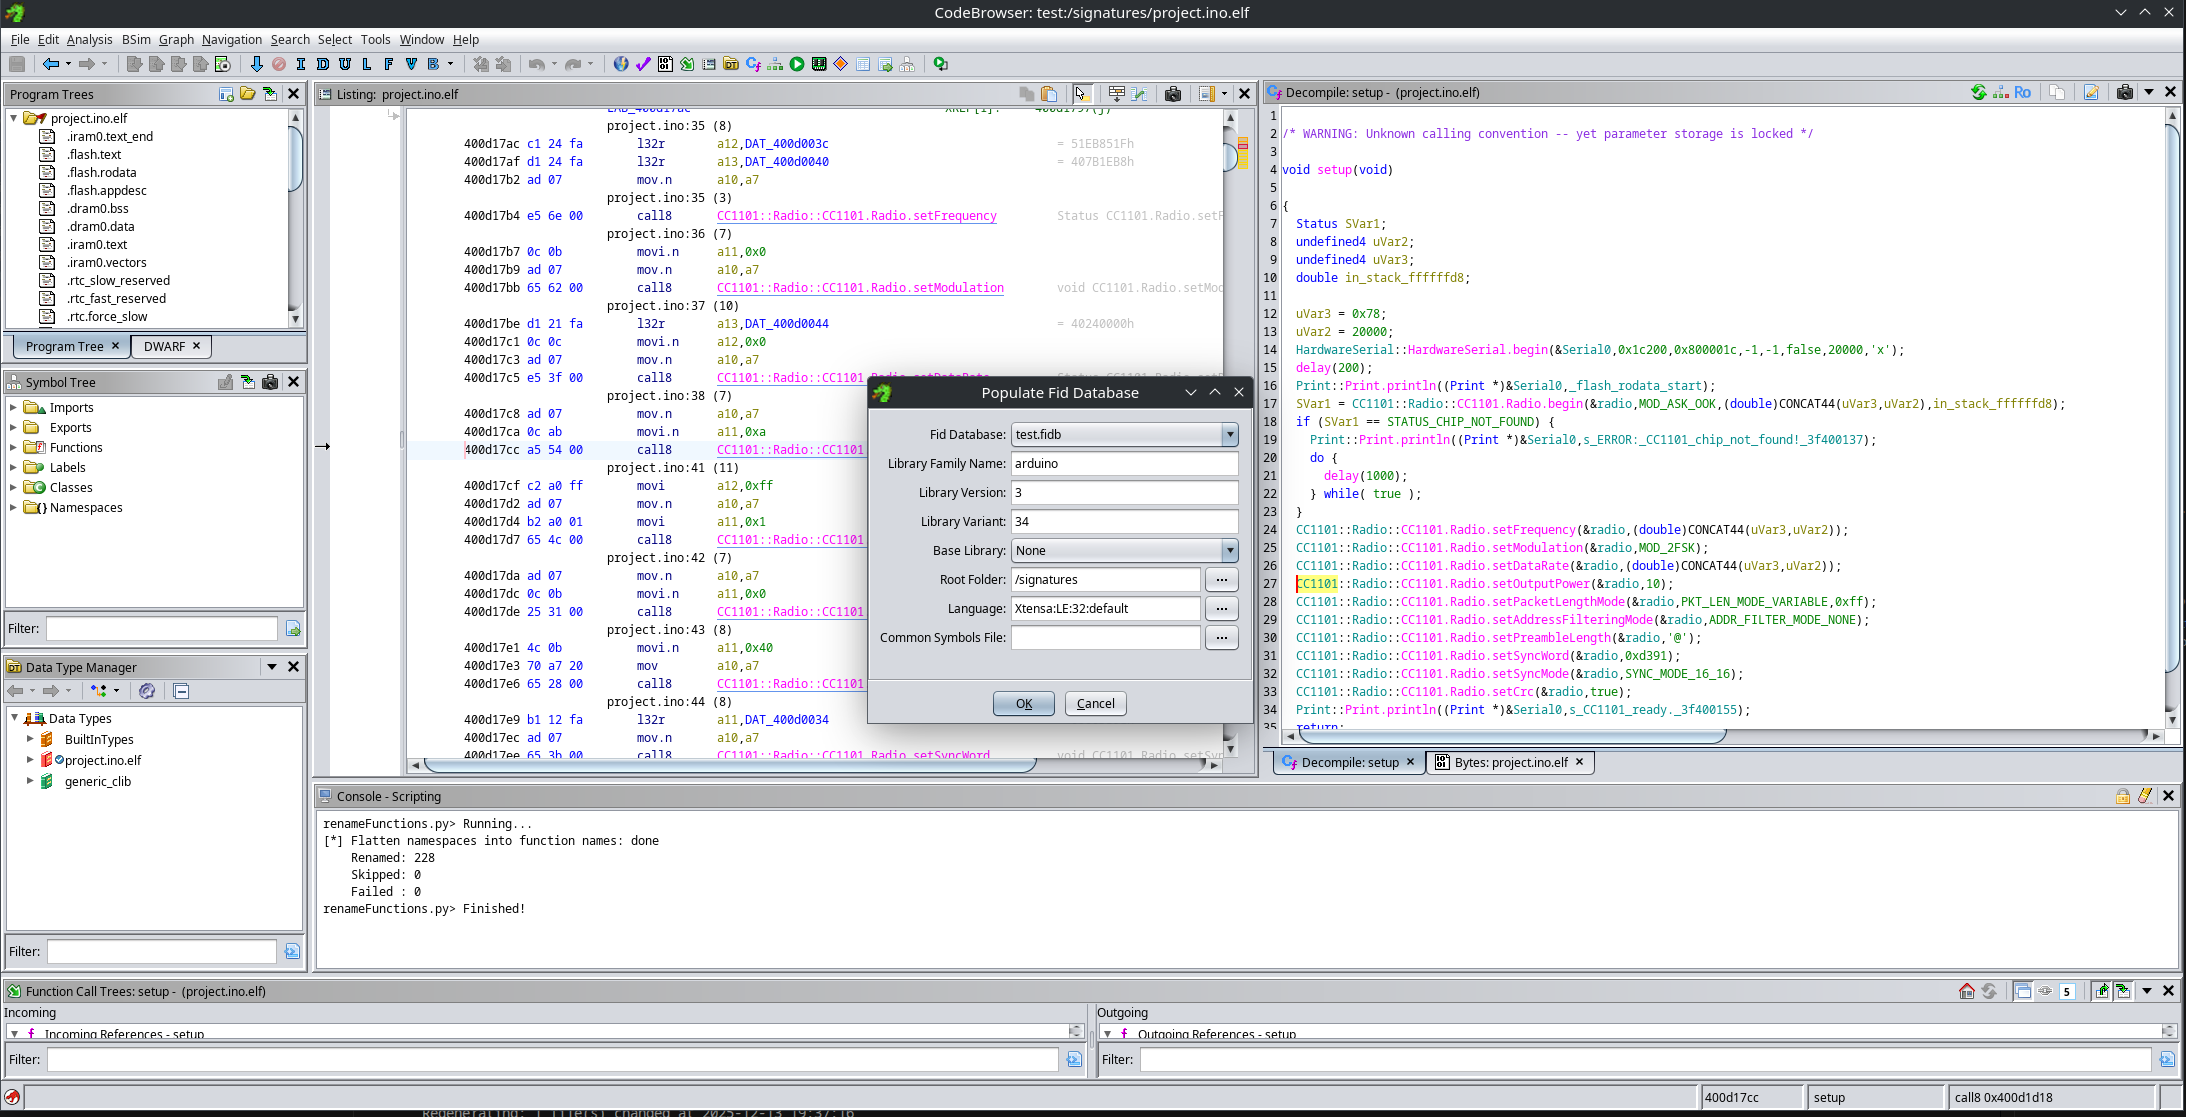
Flatten namespaces into function names
When dealing with classes names, function ID does only store the name of the function and not the class, so it is interesting to run the following script that puts the name of the class as part of the function name, so we don’t end up with multiple functions with the same name:
1
2
3
4
5
6
7
8
9
10
11
12
13
14
15
16
17
18
19
20
21
22
23
24
25
26
27
28
29
30
31
32
33
34
35
36
37
38
39
40
41
42
43
44
45
46
47
48
49
50
51
52
53
54
55
56
57
58
59
60
61
62
63
64
65
66
67
68
69
70
71
72
73
74
75
76
77
78
79
80
81
82
83
84
85
86
87
88
89
90
91
92
93
94
95
96
97
98
99
100
101
102
103
104
105
106
107
108
109
110
111
112
113
114
115
116
117
118
119
120
121
122
123
124
125
126
127
128
129
130
131
132
133
#@author
#@category Symbol
#@menupath Tools.Rename Flatten namespaces into function names
#@keybinding

from ghidra.program.model.symbol import SourceType, Namespace
from ghidra.util.exception import DuplicateNameException, InvalidInputException

# If True, we will not rename functions you already renamed manually.
SKIP_USER_DEFINED = False

# If True, skip thunks/external functions
SKIP_THUNKS = True
SKIP_EXTERNAL = True


def is_global_namespace(ns):
    try:
        # Global namespace name is typically "Global"
        return ns is None or ns.getParentNamespace() is None
    except:
        return True


def namespace_chain_for_function(f):
    """
    Returns list like ["CC1101", "Radio"] for a function living in CC1101::Radio namespace.
    """
    sym = f.getSymbol()
    if sym is None:
        return []

    ns = sym.getParentNamespace()
    parts = []
    seen = set()

    while ns is not None:
        name = ns.getName()

        # Stop at global / root-ish namespaces
        # In many programs this will be "Global", but parent==None is the safe stop.
        if ns.getParentNamespace() is None:
            break

        # Some namespaces can be empty or weird; skip empties
        if name and name not in ("Global",):
            parts.append(name)

        # safety against cycles
        key = ns.getID() if hasattr(ns, "getID") else id(ns)
        if key in seen:
            break
        seen.add(key)

        ns = ns.getParentNamespace()

    parts.reverse()
    return parts


def should_skip(f):
    if SKIP_EXTERNAL:
        try:
            if f.isExternal():
                return True
        except:
            pass

    if SKIP_THUNKS:
        try:
            if f.isThunk():
                return True
        except:
            pass

    if SKIP_USER_DEFINED:
        try:
            if f.getSymbol() is not None and f.getSymbol().getSource() == SourceType.USER_DEFINED:
                return True
        except:
            pass

    return False


def main():
    fm = currentProgram.getFunctionManager()
    it = fm.getFunctions(True)

    renamed = 0
    skipped = 0
    failed = 0

    for f in it:
        if monitor.isCancelled():
            break

        if should_skip(f):
            skipped += 1
            continue

        base = f.getName()
        chain = namespace_chain_for_function(f)

        if not chain:
            continue

        new_name = ".".join(chain + [base])

        if new_name == base:
            continue

        # Avoid double-flattening if you run the script multiple times:
        # If the function is already named with the same prefix, skip.
        if base.startswith(".".join(chain) + "."):
            continue

        try:
            f.setName(new_name, SourceType.USER_DEFINED)
            renamed += 1
        except (DuplicateNameException, InvalidInputException):
            failed += 1
        except Exception:
            failed += 1

    print("[*] Flatten namespaces into function names: done")
    print("    Renamed: %d" % renamed)
    print("    Skipped: %d" % skipped)
    print("    Failed : %d" % failed)


if __name__ == "__main__":
    main()
Script run example:
| Before | After |
|---|---|
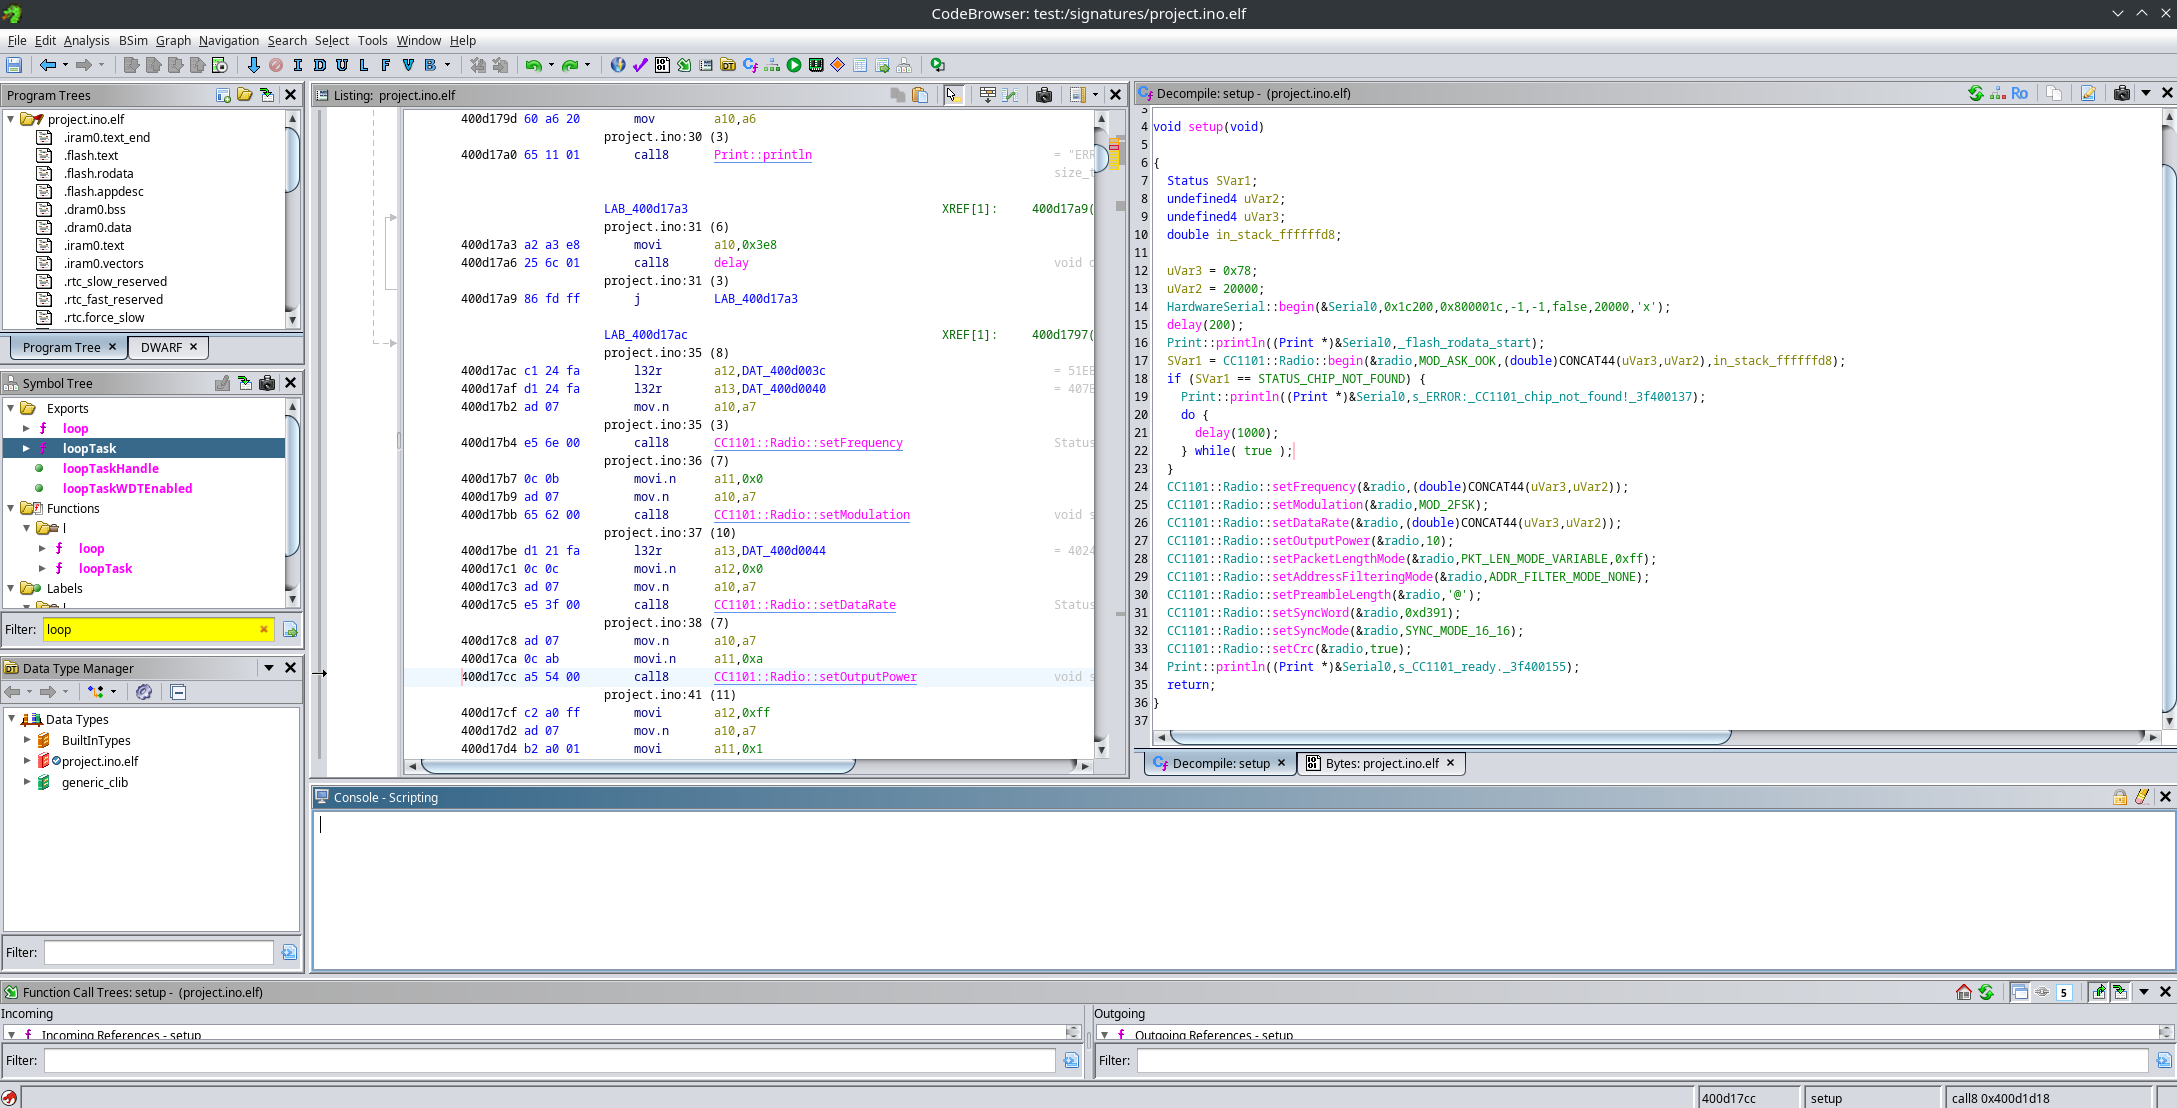 | 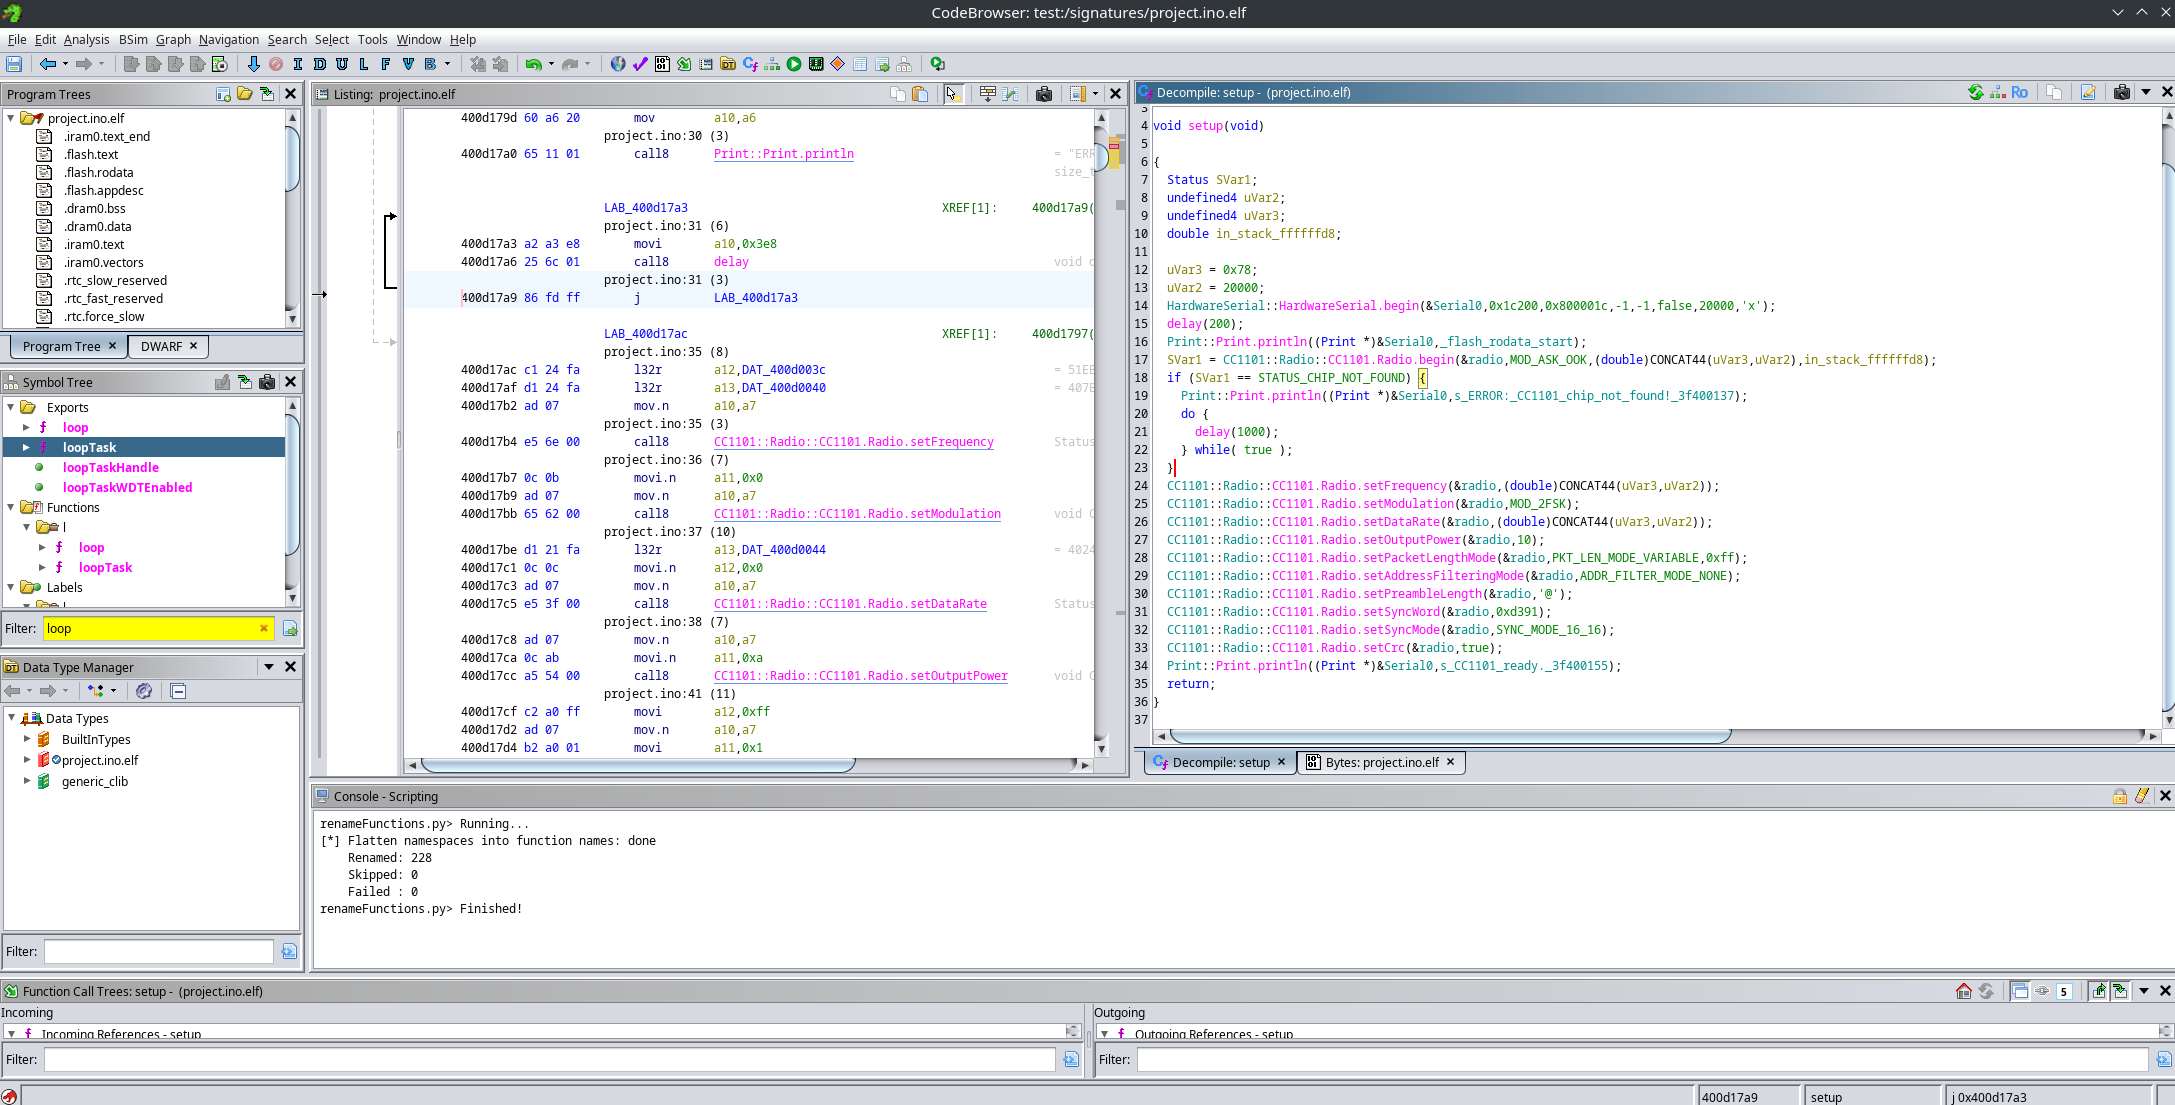 |
Step 3: Loading the project into Ghidra
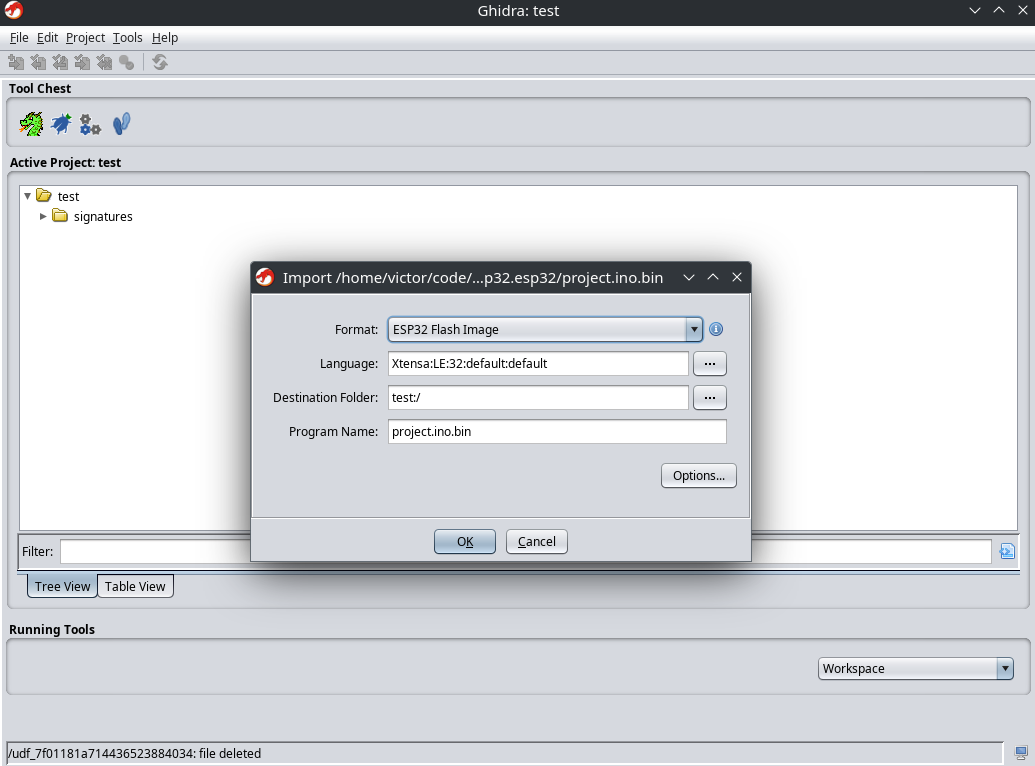
Now comes the big step: loading the project.ino.bin file into Ghidra. For this, we will use
ghidra-esp32-flash-loader.
I found an issue in the upstream loader, so I strongly recommend using the corrected branch:
If you want to use a ghidra version previous to 12 (which had some breaking changes for plugins) you should do:
1
2
3
git clone https://github.com/vik0t0r/ghidra-esp32-flash-loader.git
cd ghidra-esp32-flash-loader
git checkout fix-segment-loading
If not, you can get the upstream version (which works with ghidra 12 and has the fixes applied):
1
2
git clone https://github.com/dynacylabs/ghidra-esp32-flash-loader
cd ghidra-esp32-flash-loader
And don’t forget to initialize and download the submodules!!!
1
git submodule update --init --recursive
Now we can build the plugin. Make sure to update the path so it points to your actual Ghidra installation directory:
1
2
export GHIDRA_INSTALL_DIR=~/ghidra_11.4.2_PUBLIC
gradle
If everything goes well, you should now have an installable .zip plugin inside the dist folder.
Install this extension in Ghidra via File → Install Extensions, restart Ghidra, and you’re good to go.
If everything worked correctly, loading platform.ino.bin will be recognized automatically, and the ESP32 flash loader will be available:
First Analysis
When the binary is first loaded, Ghidra will prompt you to analyze the program. Choose Yes, and make sure to adjust the Function ID analyzer options.
Lower the following parameters:
- Instruction count threshold: from
14.6to7 - Multiple match threshold: from
30to15
I’ve found that if you don’t lower these values, most functions will not be recognized correctly.
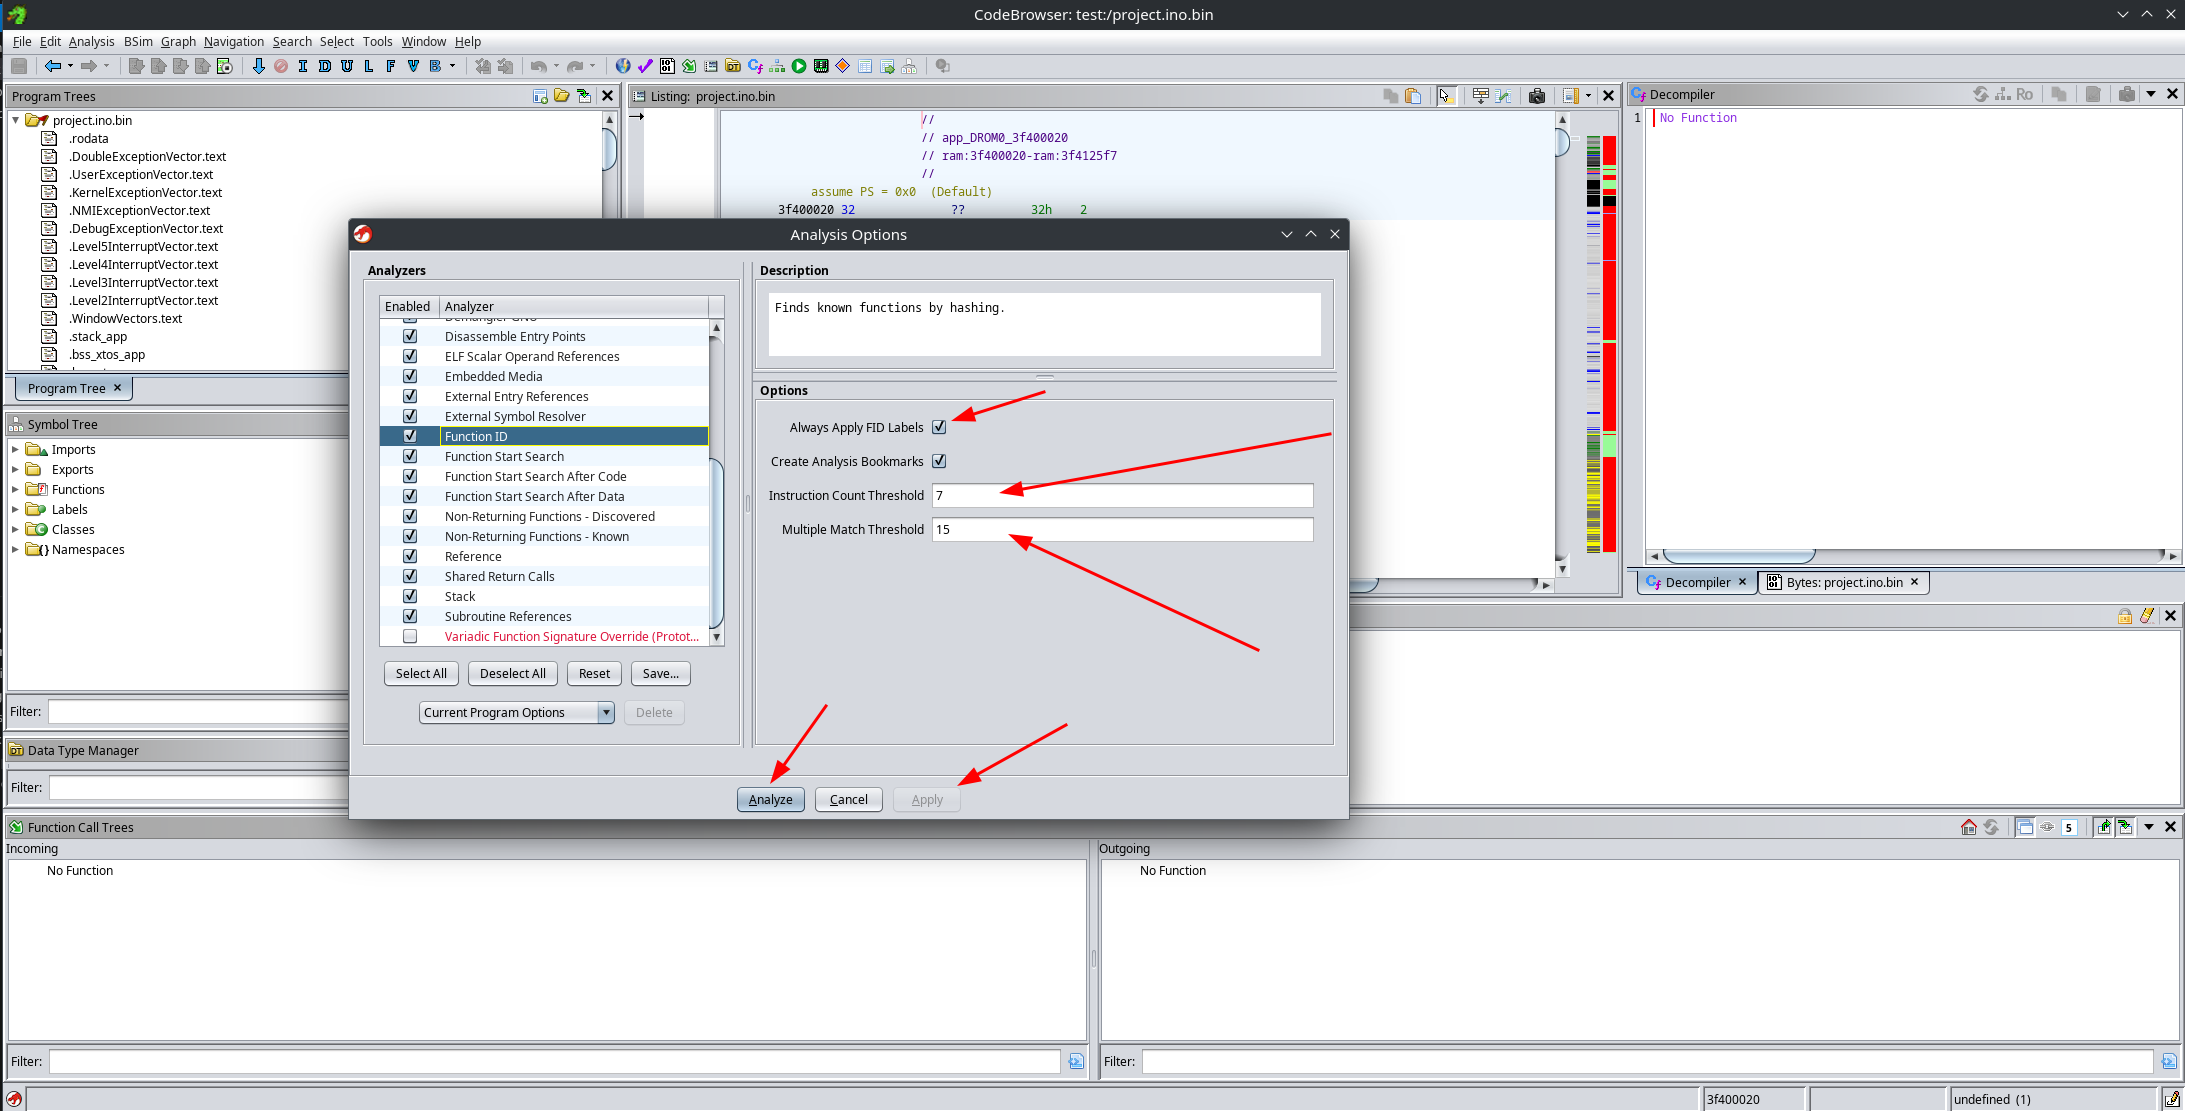
Once configured, start the analysis and wait for it to finish.
Step 4: Analysis
Now comes the fun part. Before diving into reverse engineering, you should probably read
A short guide to Xtensa assembly language, as it explains several peculiarities of the architecture.
One of the most relevant aspects is that Xtensa instructions are usually 24 bits wide. This makes it impossible to encode full 32-bit addresses directly inside instructions. As a consequence, pointers are typically stored in nearby memory locations and loaded indirectly, rather than being embedded directly in the instruction stream.
Another important aspect is the calling convention, which is admittedly quite messy. I haven’t really dived deeply into its exact details, mainly because Ghidra does a surprisingly good job at figuring out which arguments live in which registers.
Fixing decompiler output
After loading the binary, Ghidra will ask whether you want to jump to the main symbol. This is a lie. That entry point belongs to the bootloader, and there is no practical way to reach the actual application code from there.
Instead, you should search for the xTaskCreateUniversal function. Arduino uses this routine to create its main FreeRTOS task, which is responsible for calling setup() and repeatedly executing loop().
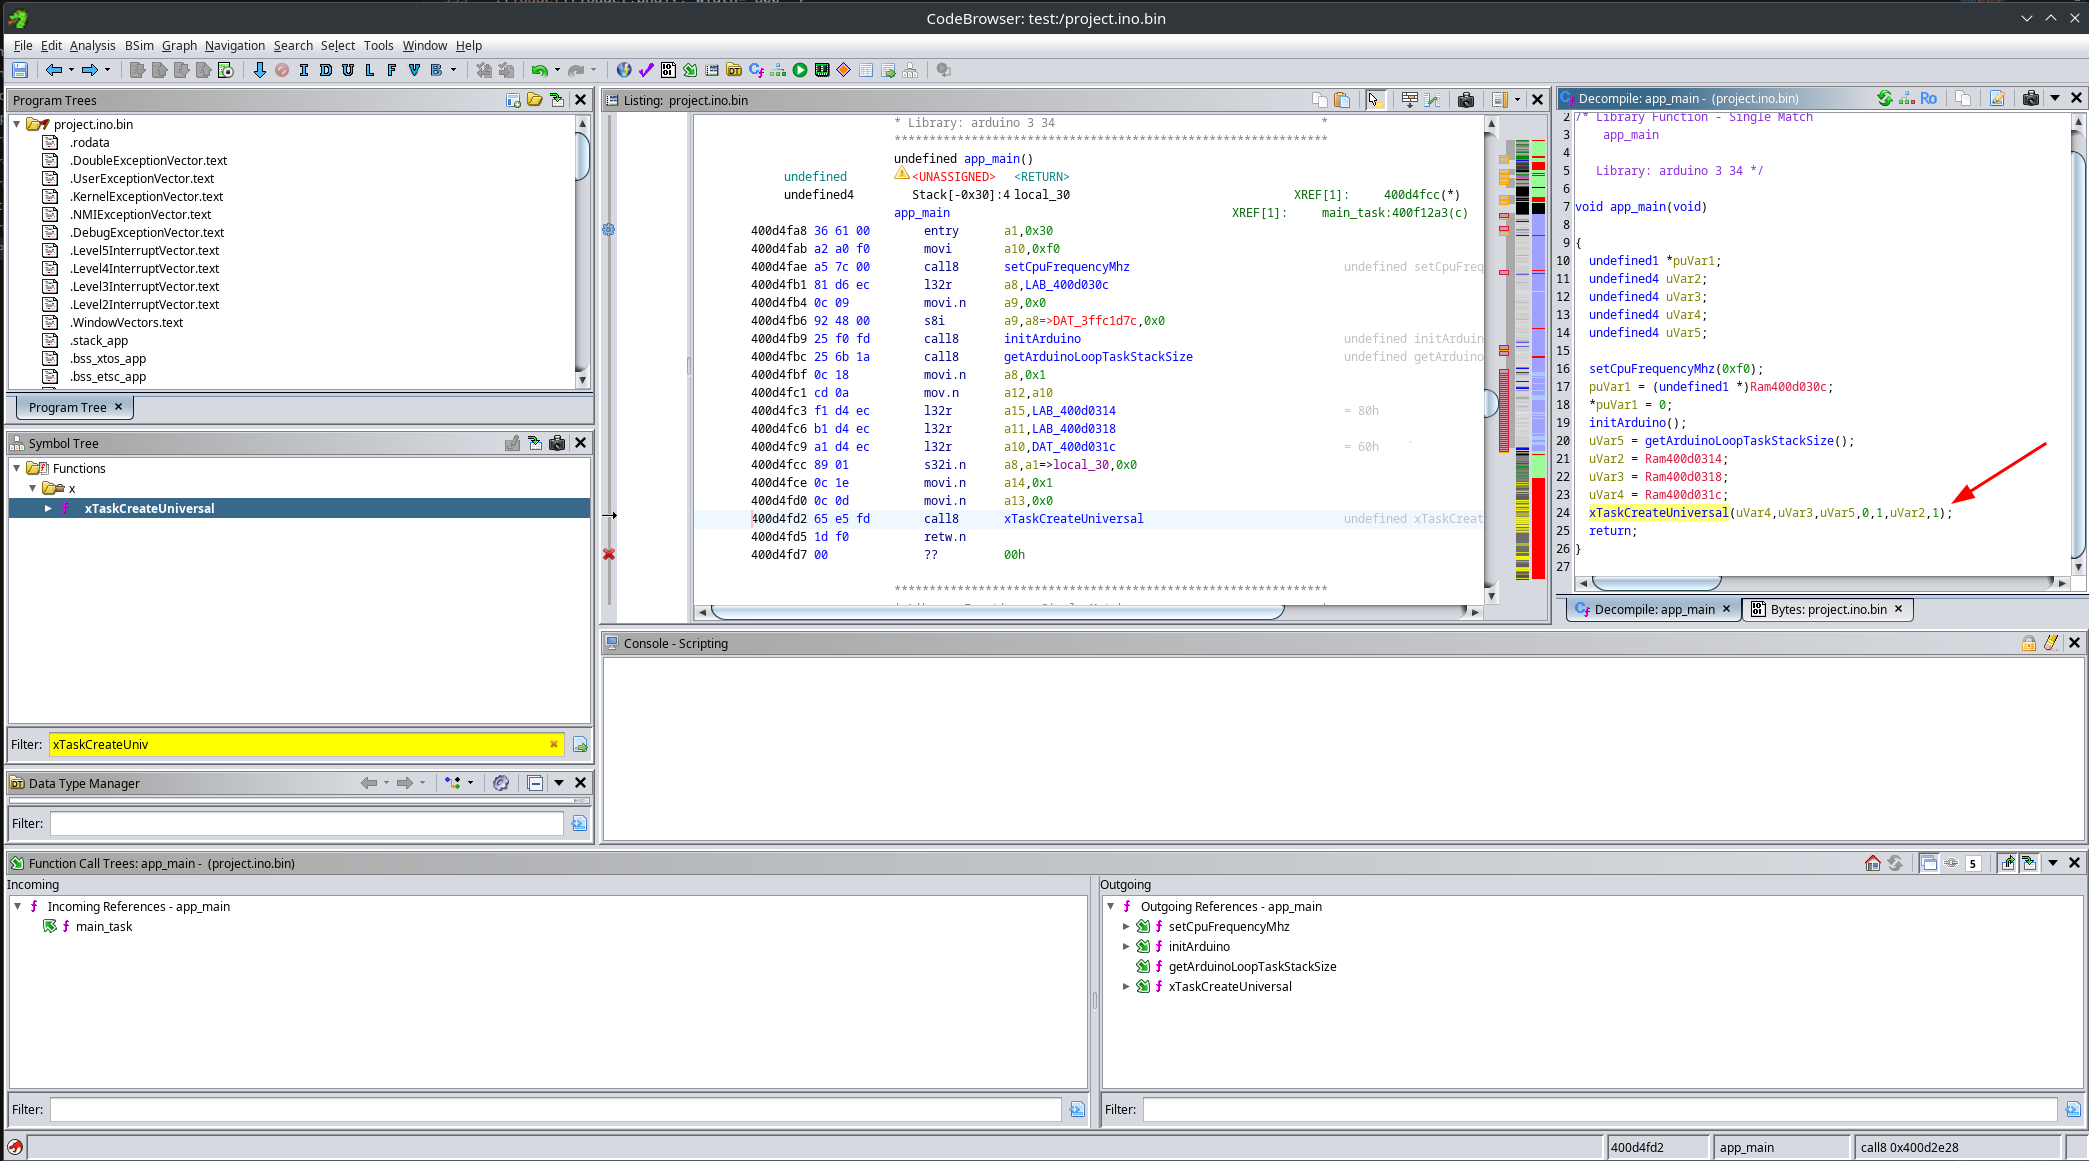
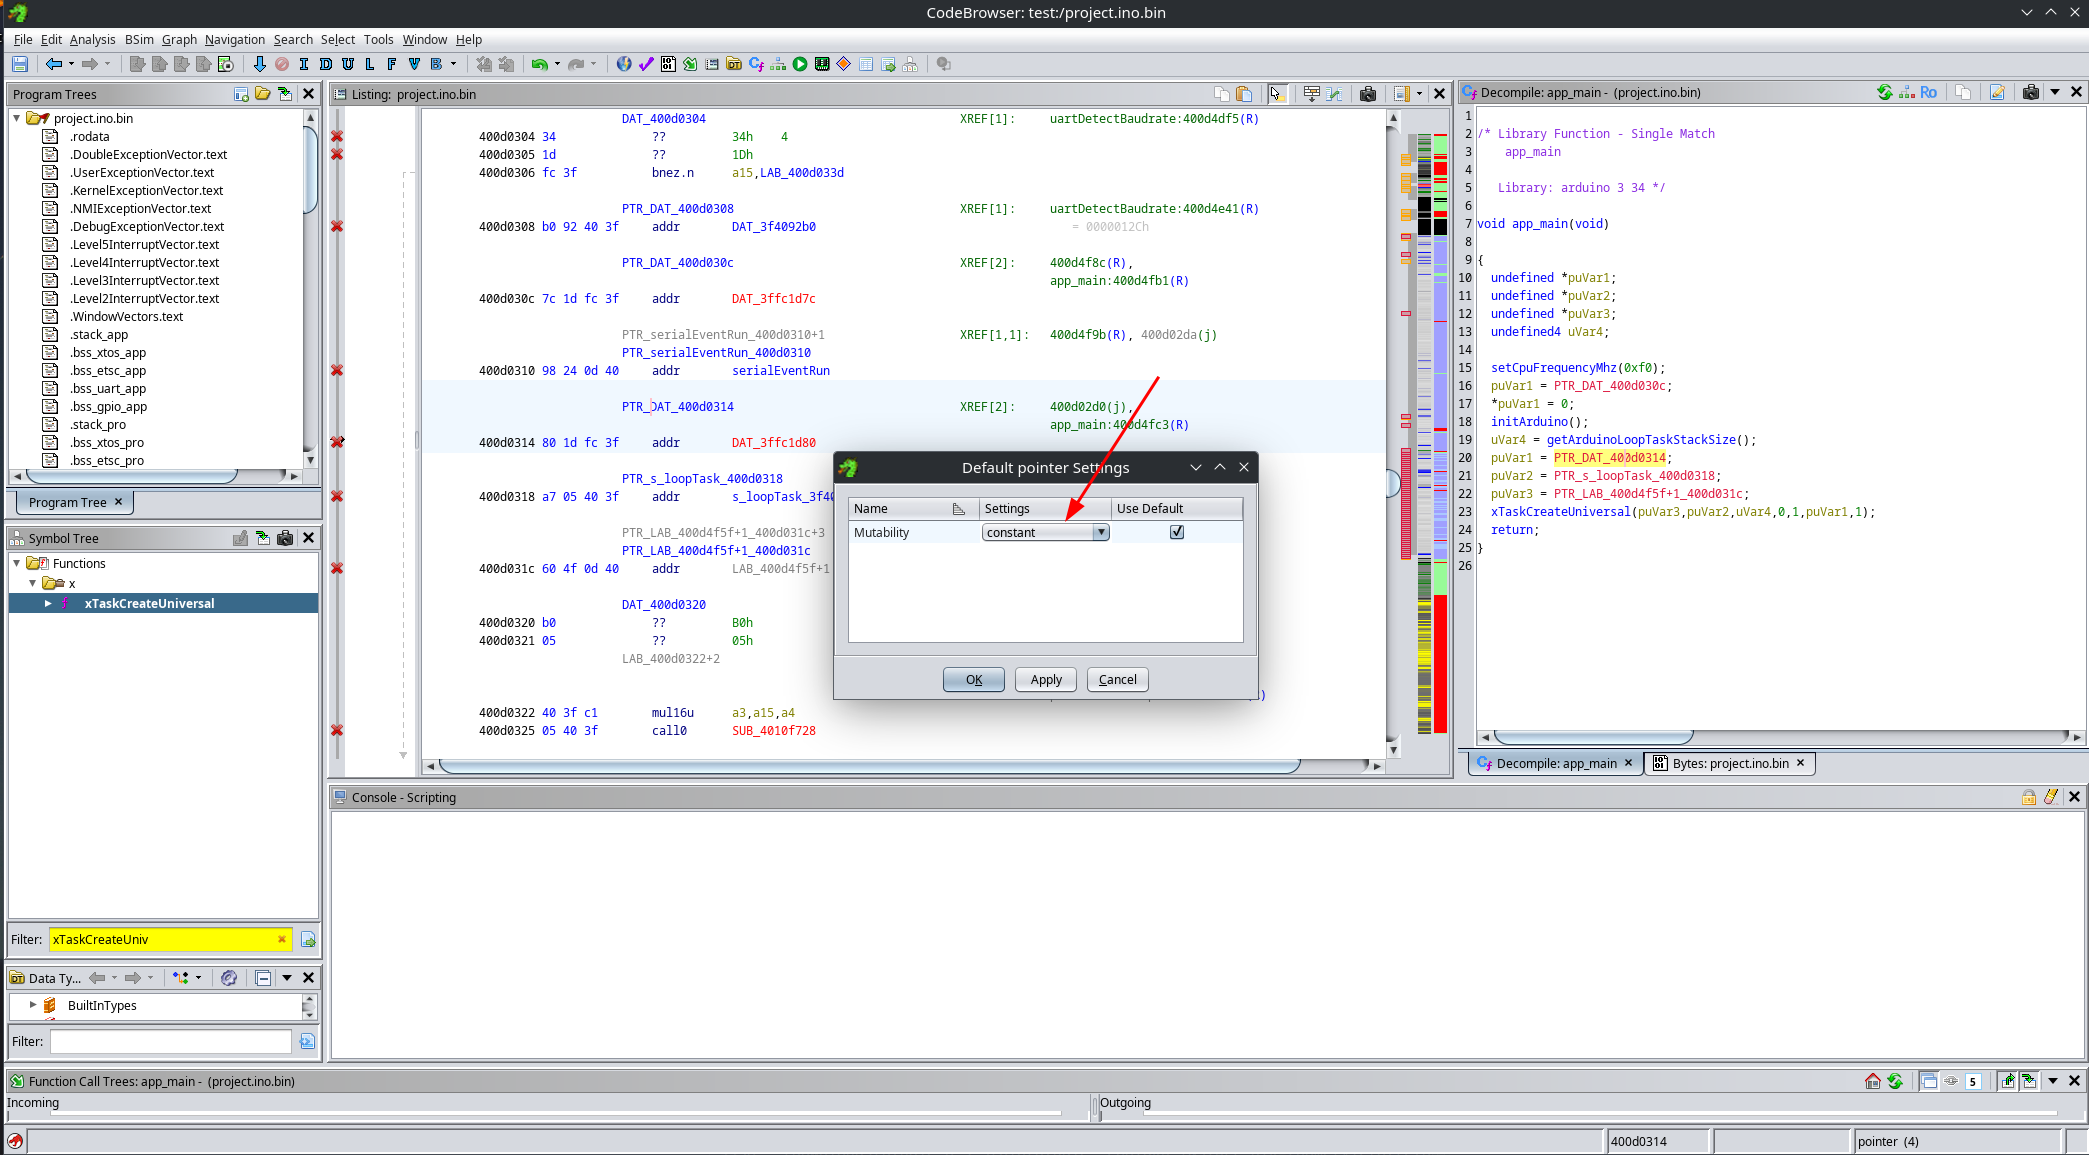
As you can see, Ghidra fails to properly resolve the constants used in this function call. This happens because pointers are stored as data, and for some reason Ghidra fails to detect that they are pointers, attempting to decompile them as code instead:
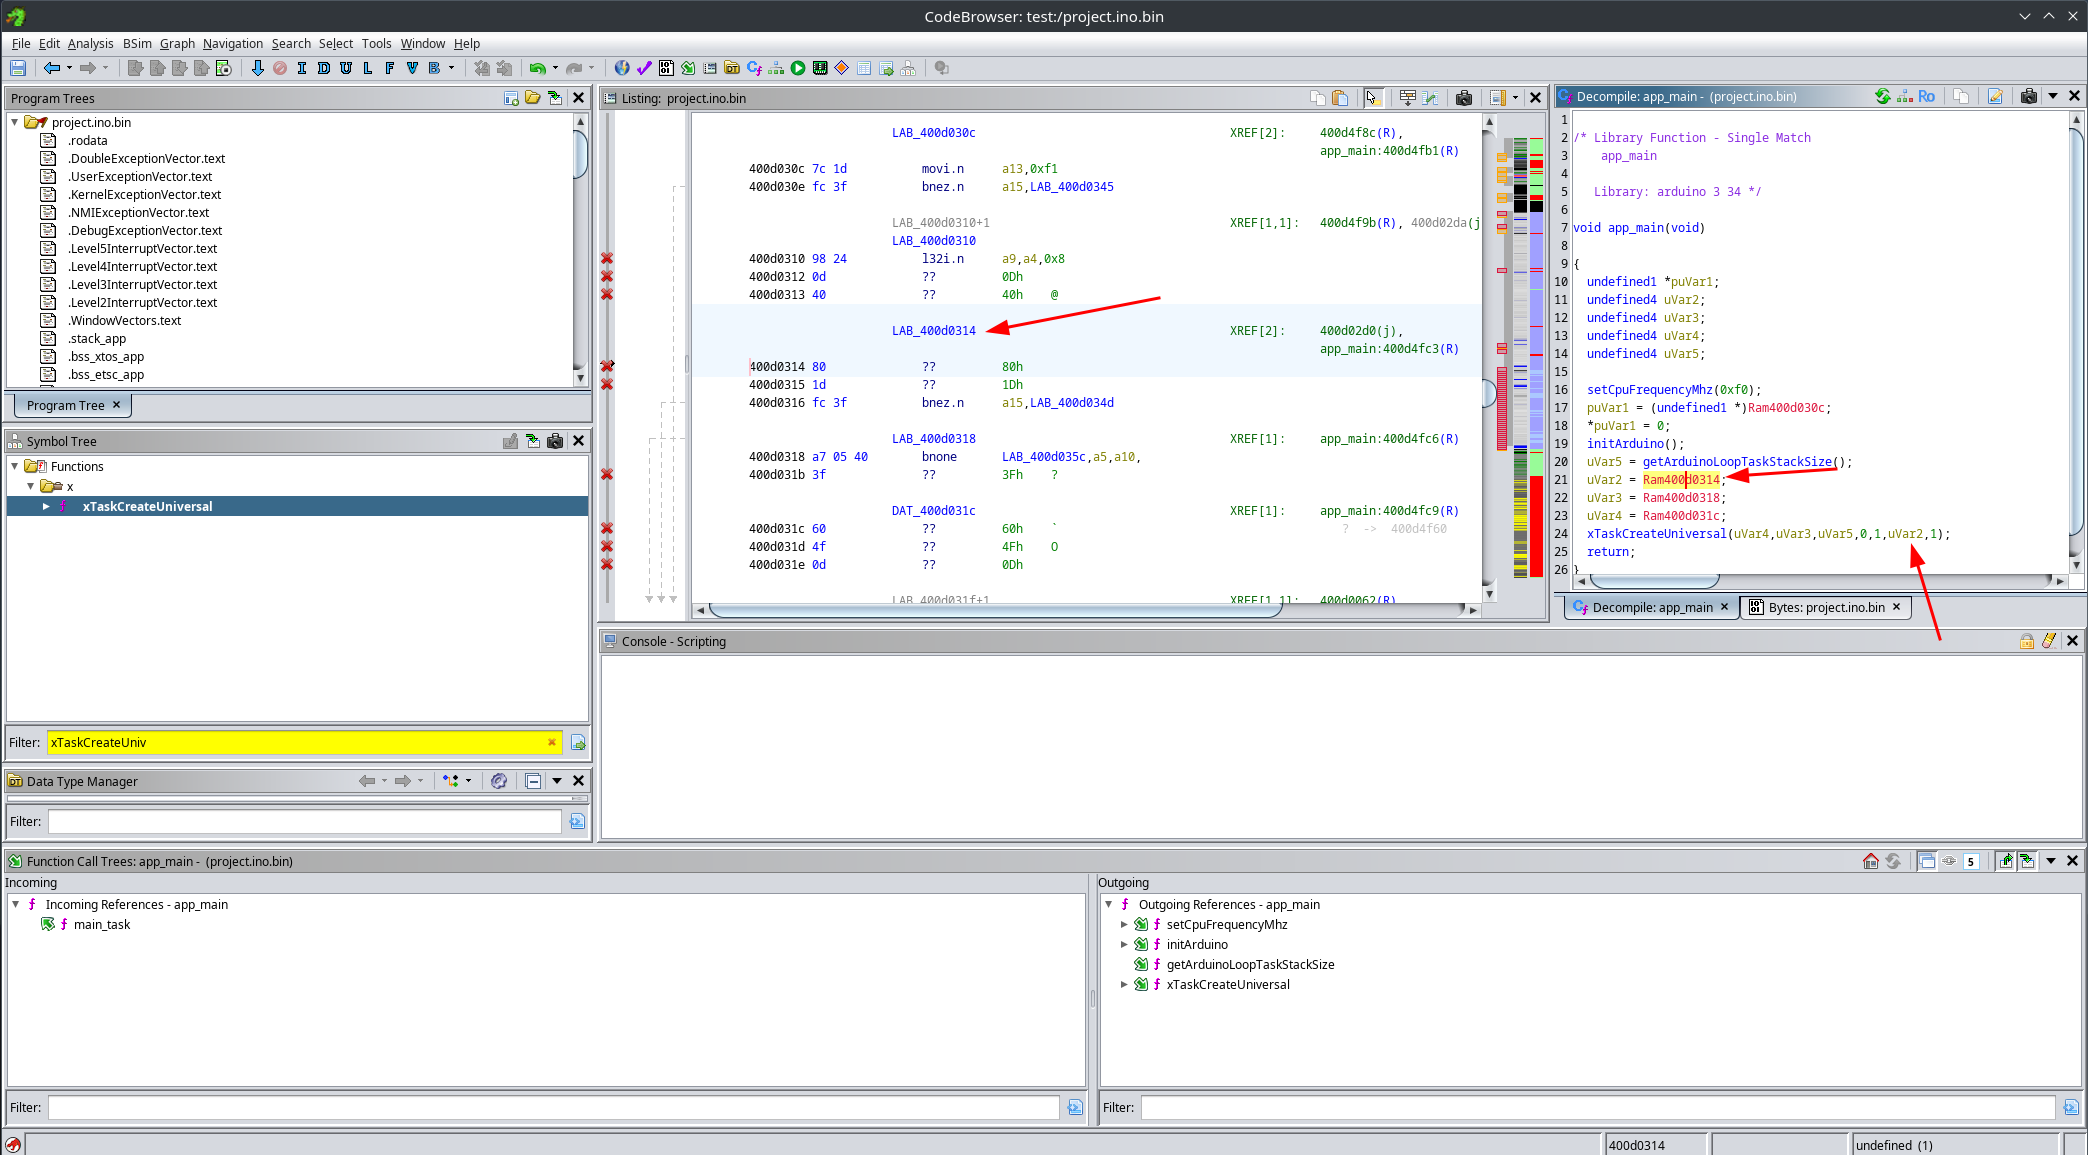
Luckily, this has an easy fix. Simply select the constant area, clear it using the c key, and then re-apply the pointer data type using the P key.
By default, Ghidra assumes that pointers are mutable, meaning they can be modified at runtime. However, if we take a closer look at these pointers, we can see that they are only ever read. This means we can safely mark them as constants, which significantly improves the decompiler output.
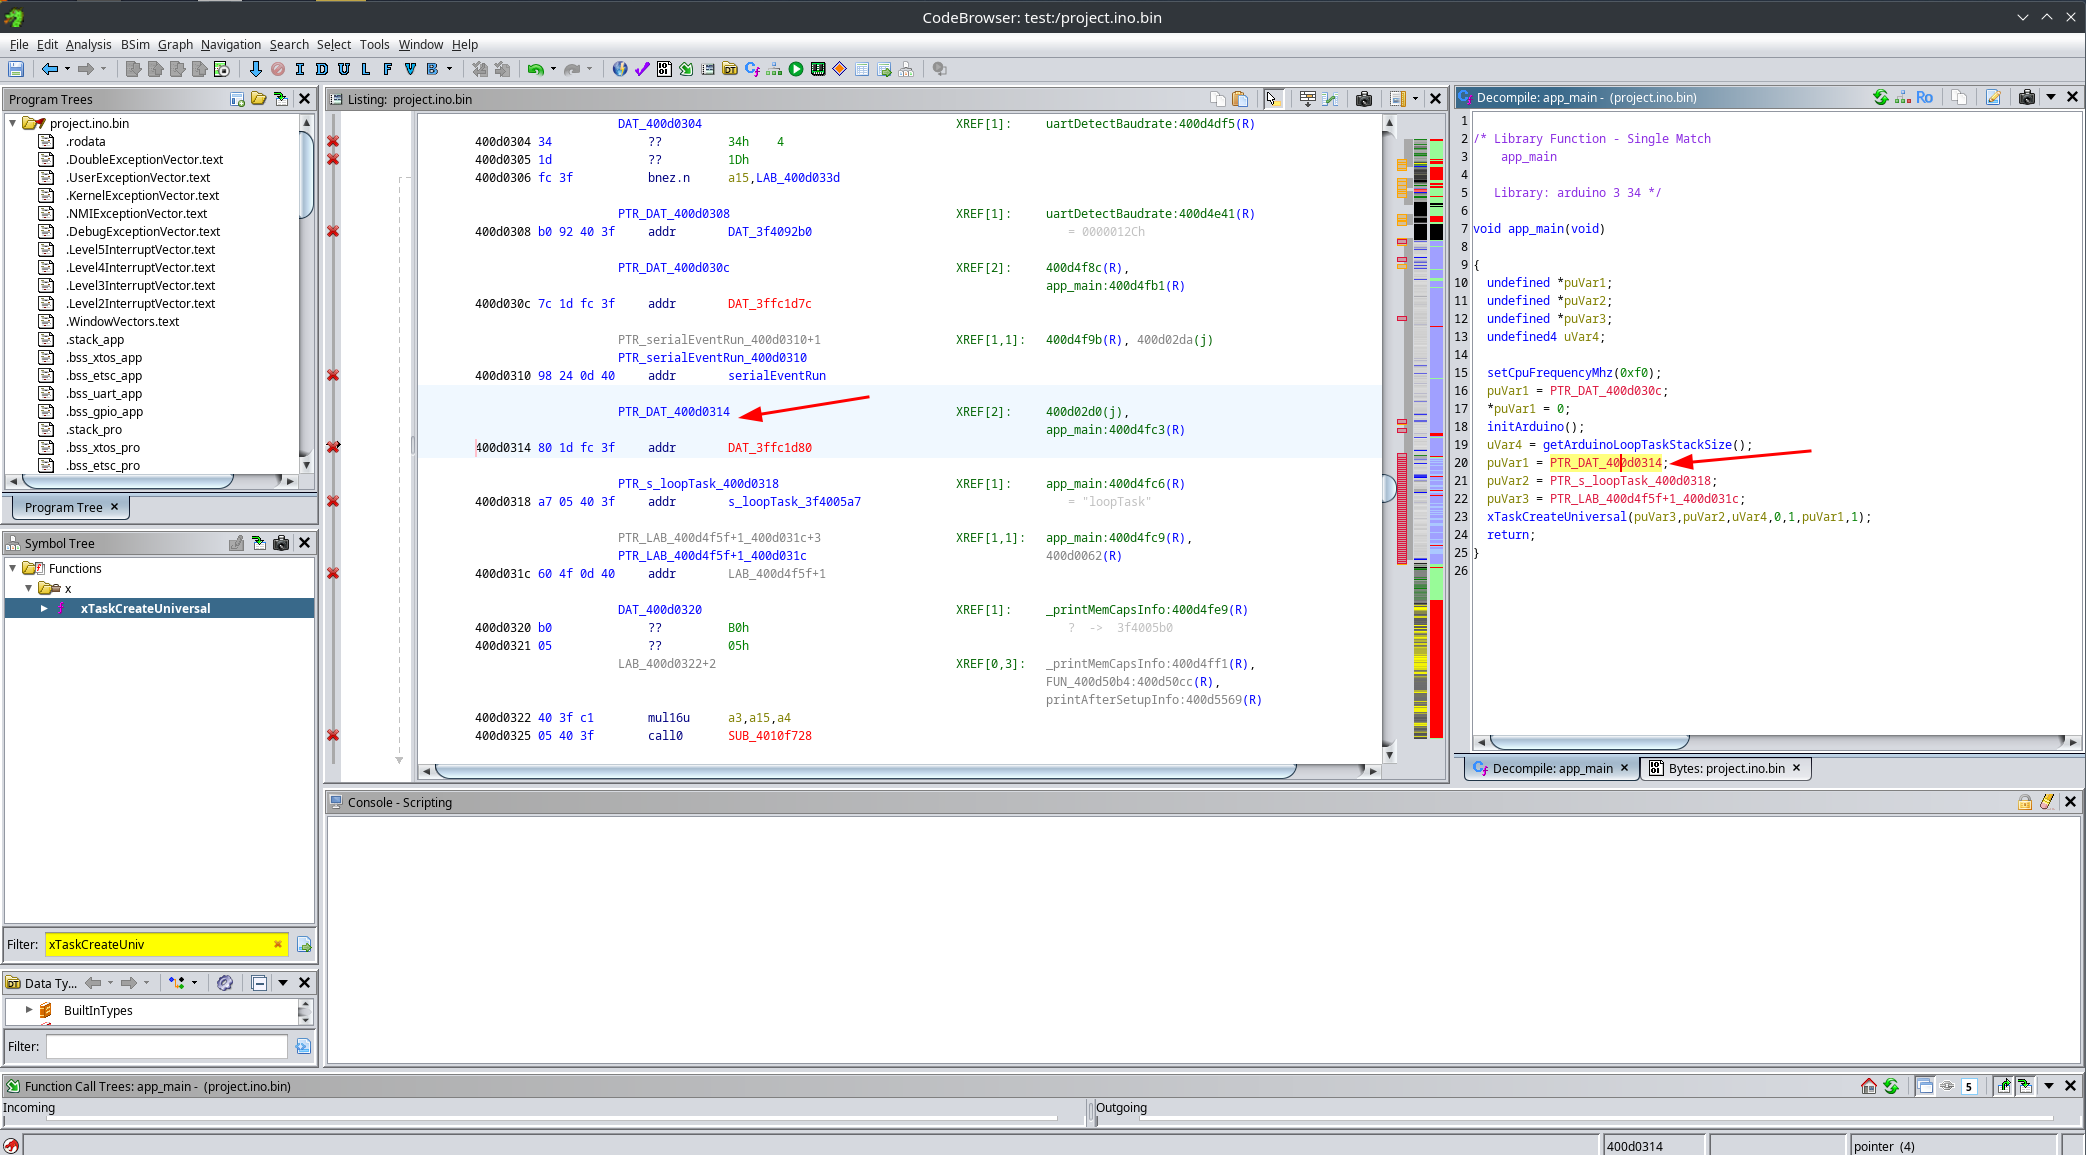
To do this, right-click on a pointer and choose Data → Default Settings, then change the mutability to constant:
After doing this, the decompiler output becomes much cleaner. Looks like magic:
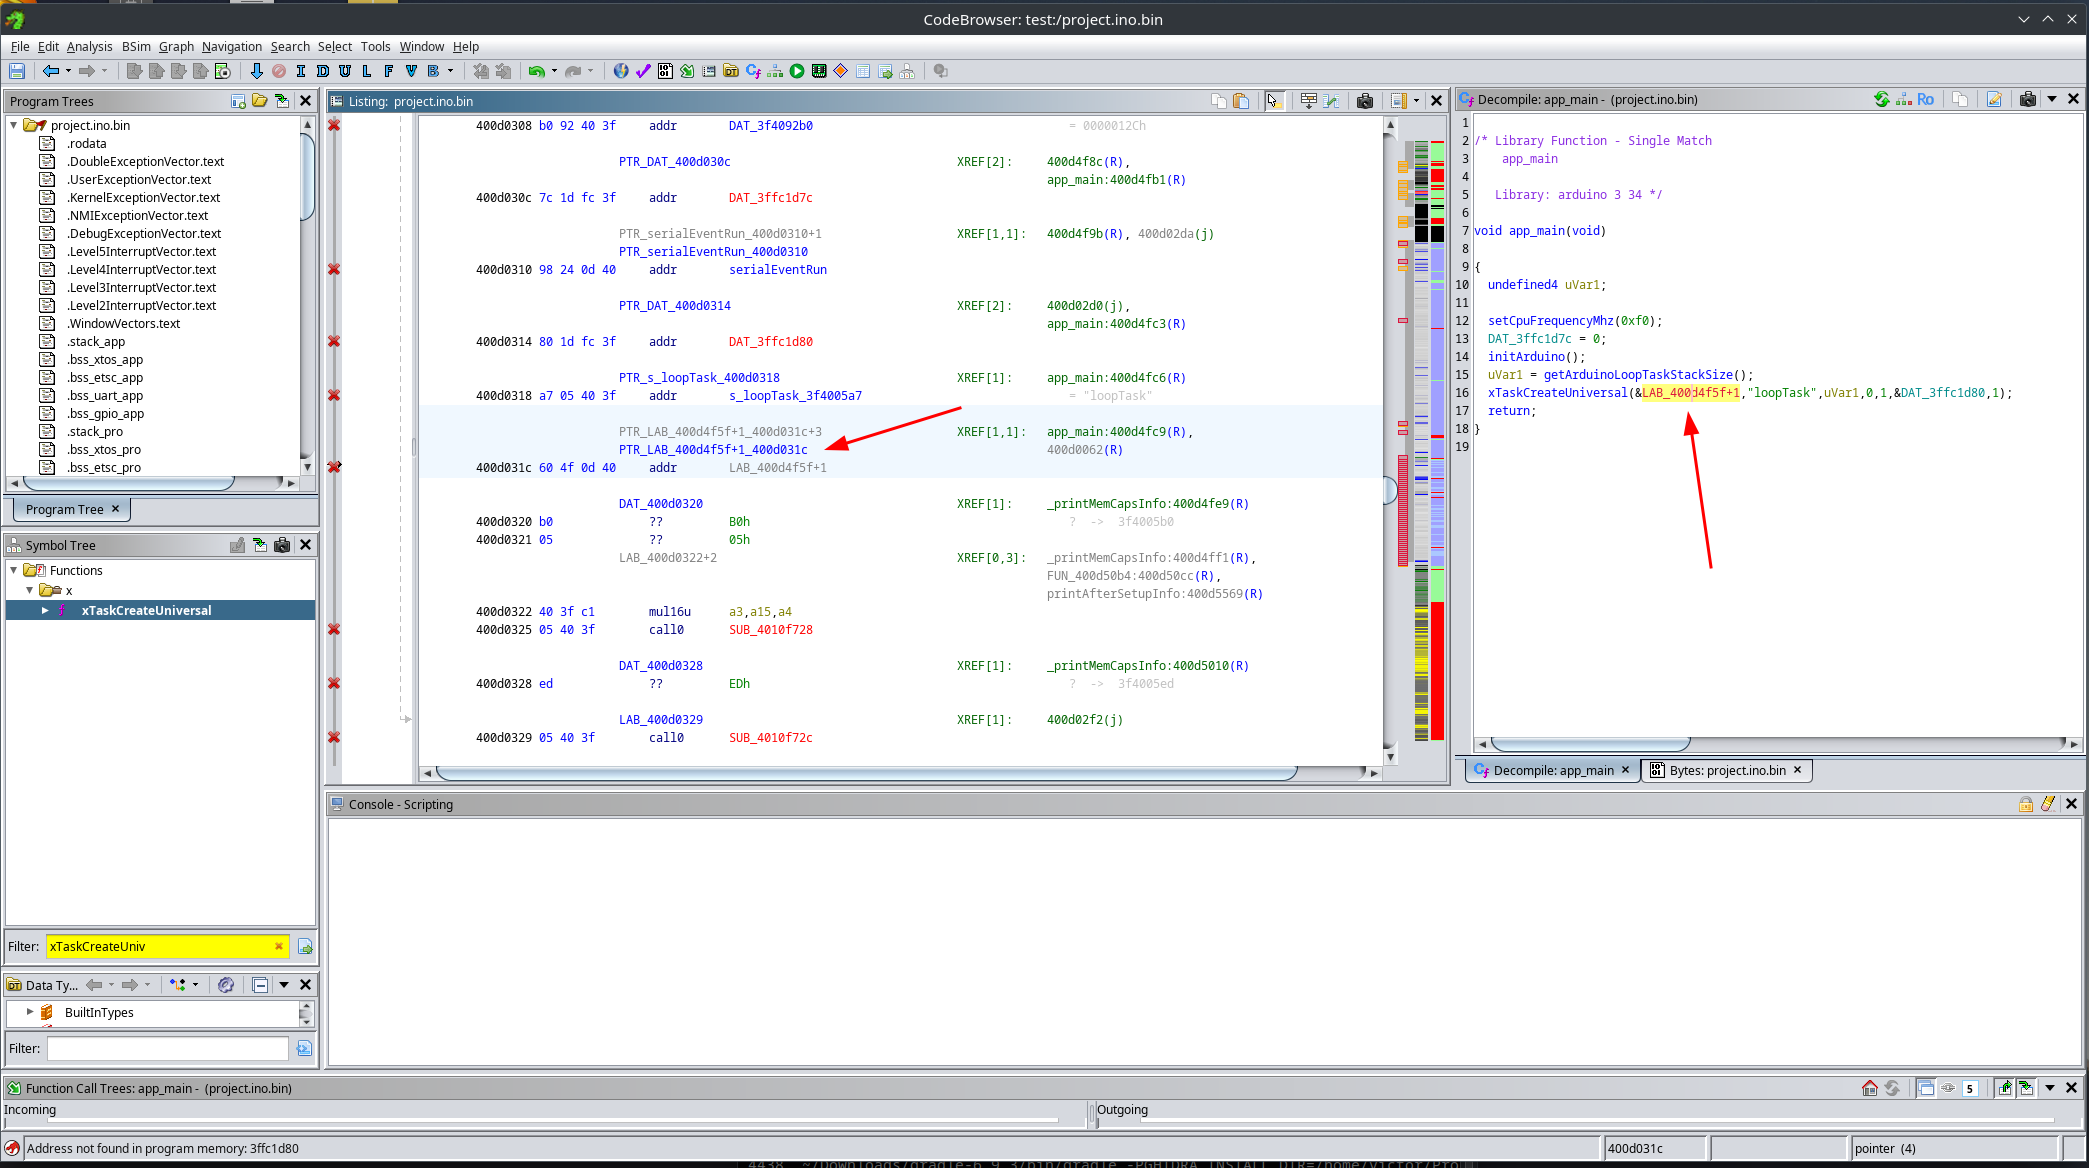
We are still missing one final fix. Ghidra sometimes fails to correctly identify function boundaries. In this case, it is clear that the first parameter to xTaskCreateUniversal is the entry point of the task to execute. However, this entry point has not been decompiled correctly.
To fix this, we need to clear the code bytes at the wrong location, then start disassembly at the correct address and explicitly create a function there.
So we go from this:
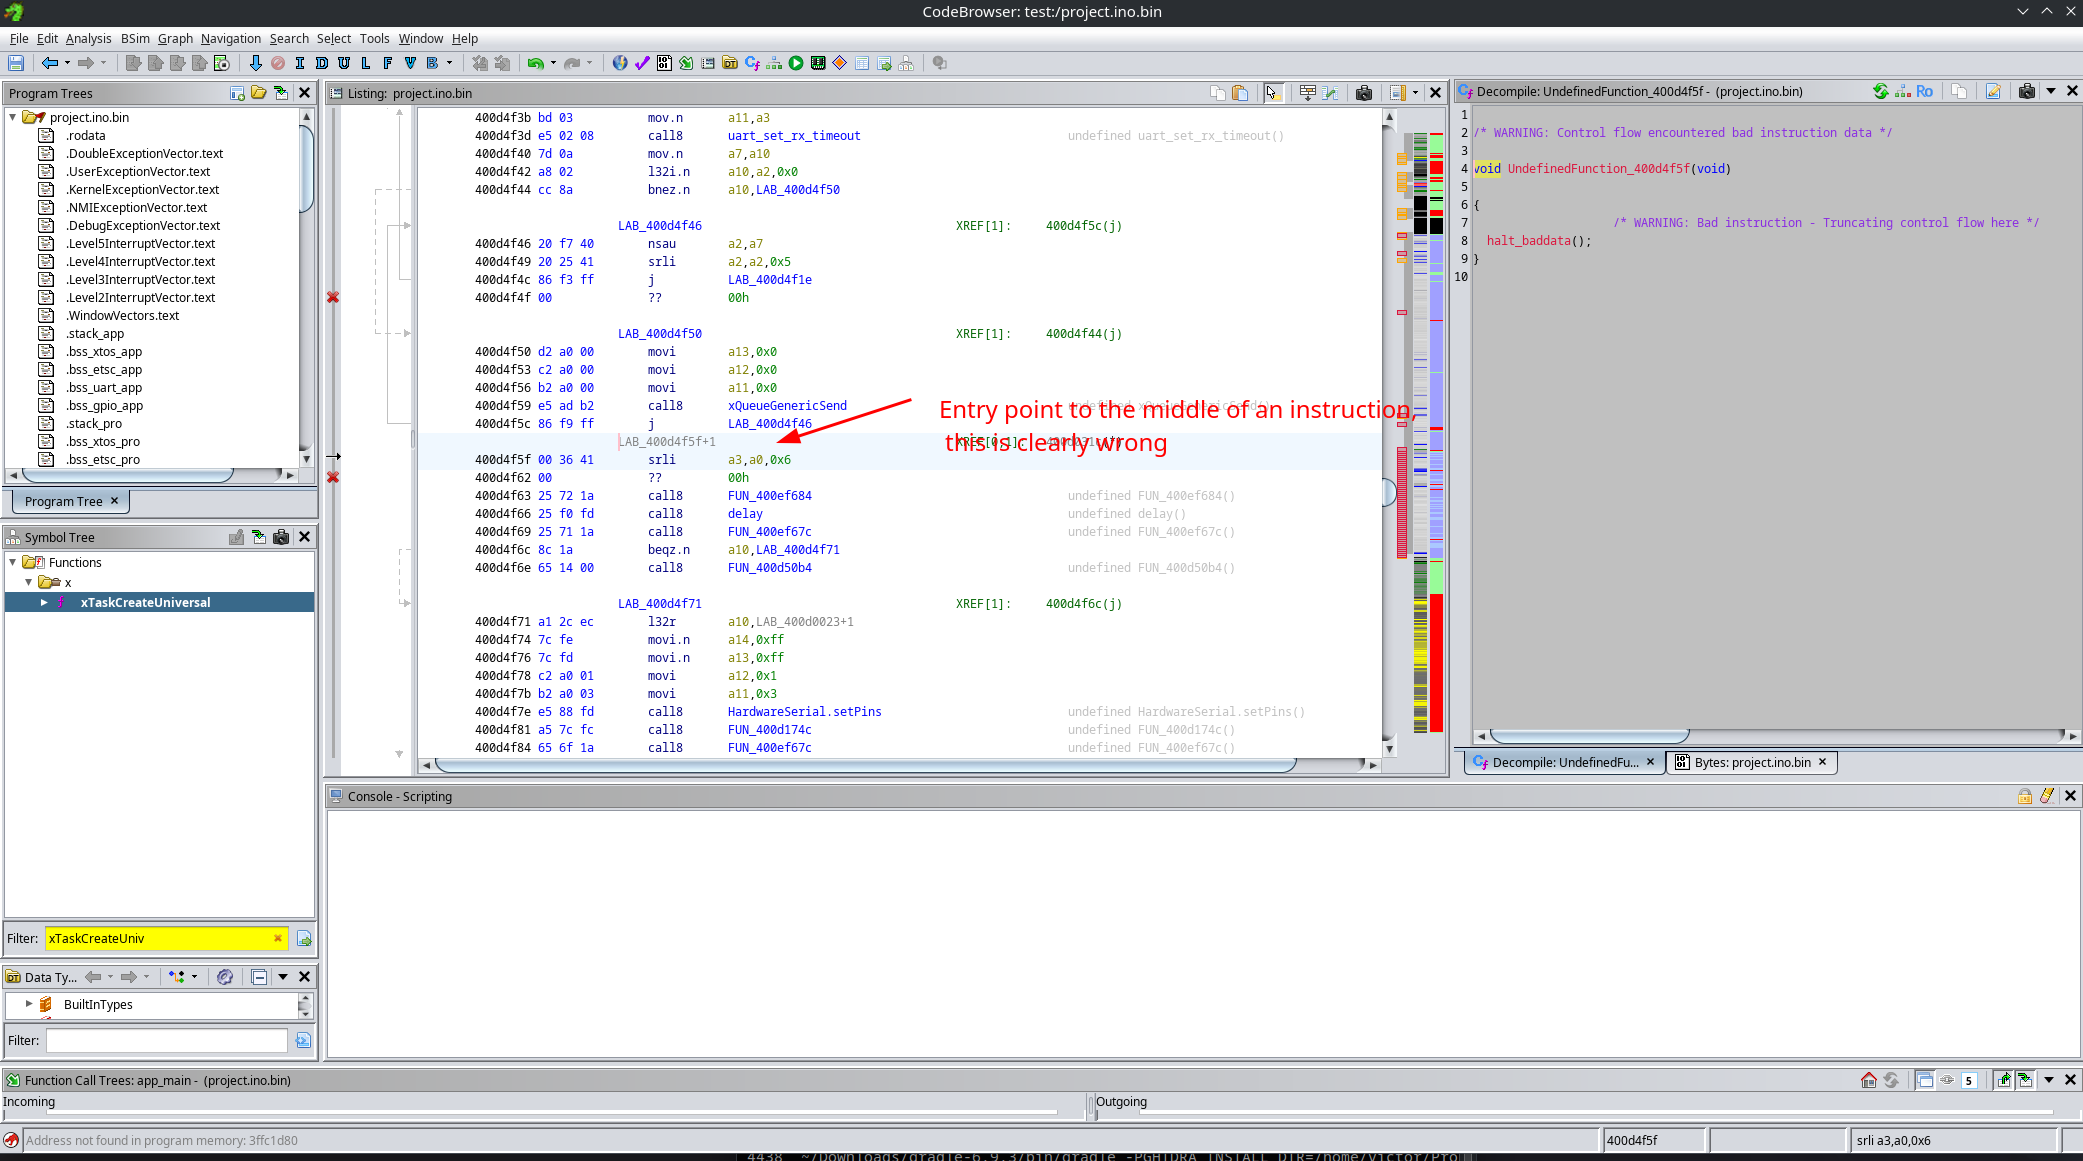
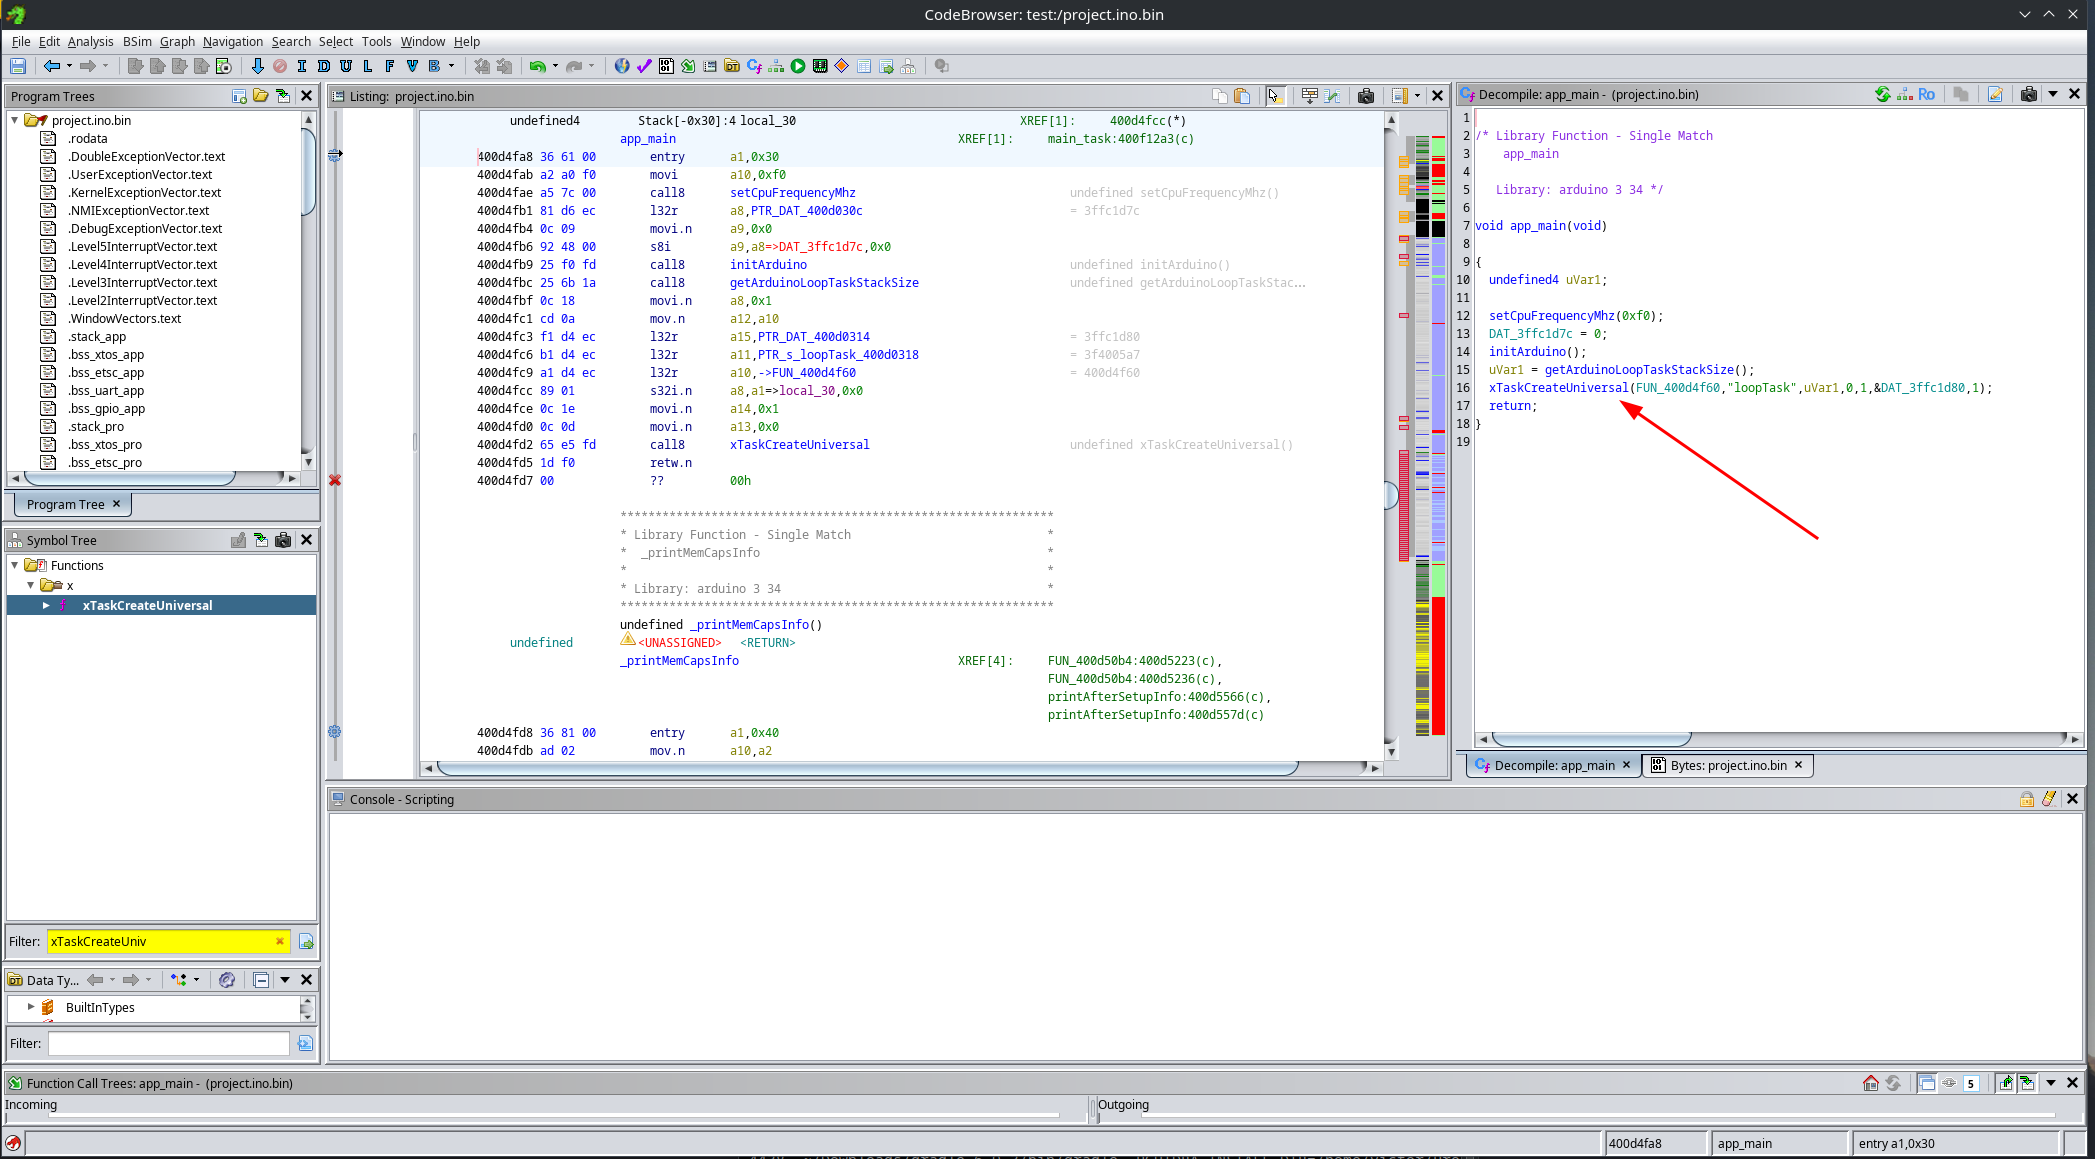
To this, look how the entry point of the function uses the entry instruction:

This leaves us with a nice and clean app_main(), whose only job is to launch the Arduino loopTask:
From this function, we can then reverse engineer setup() and loop():
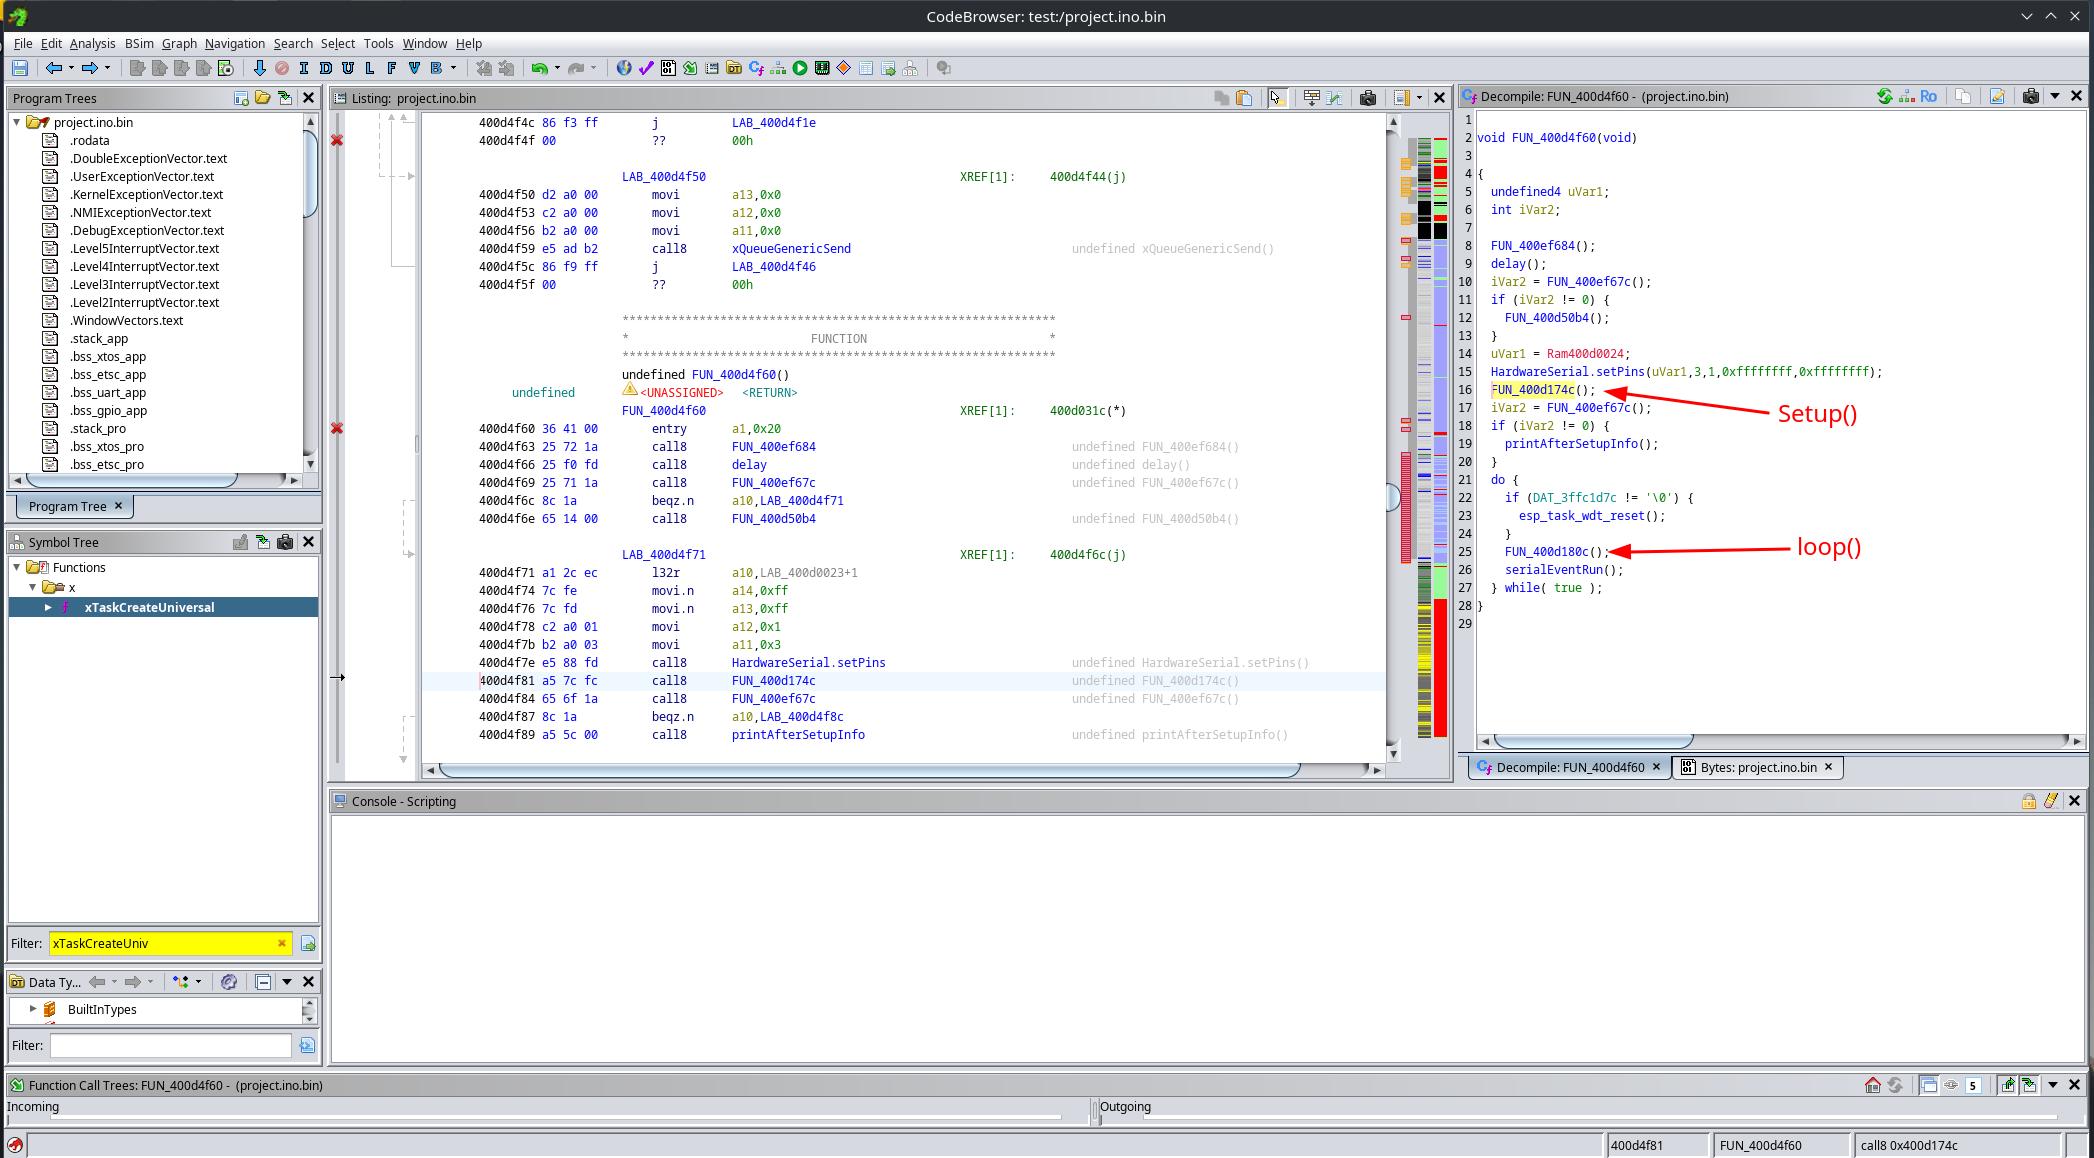
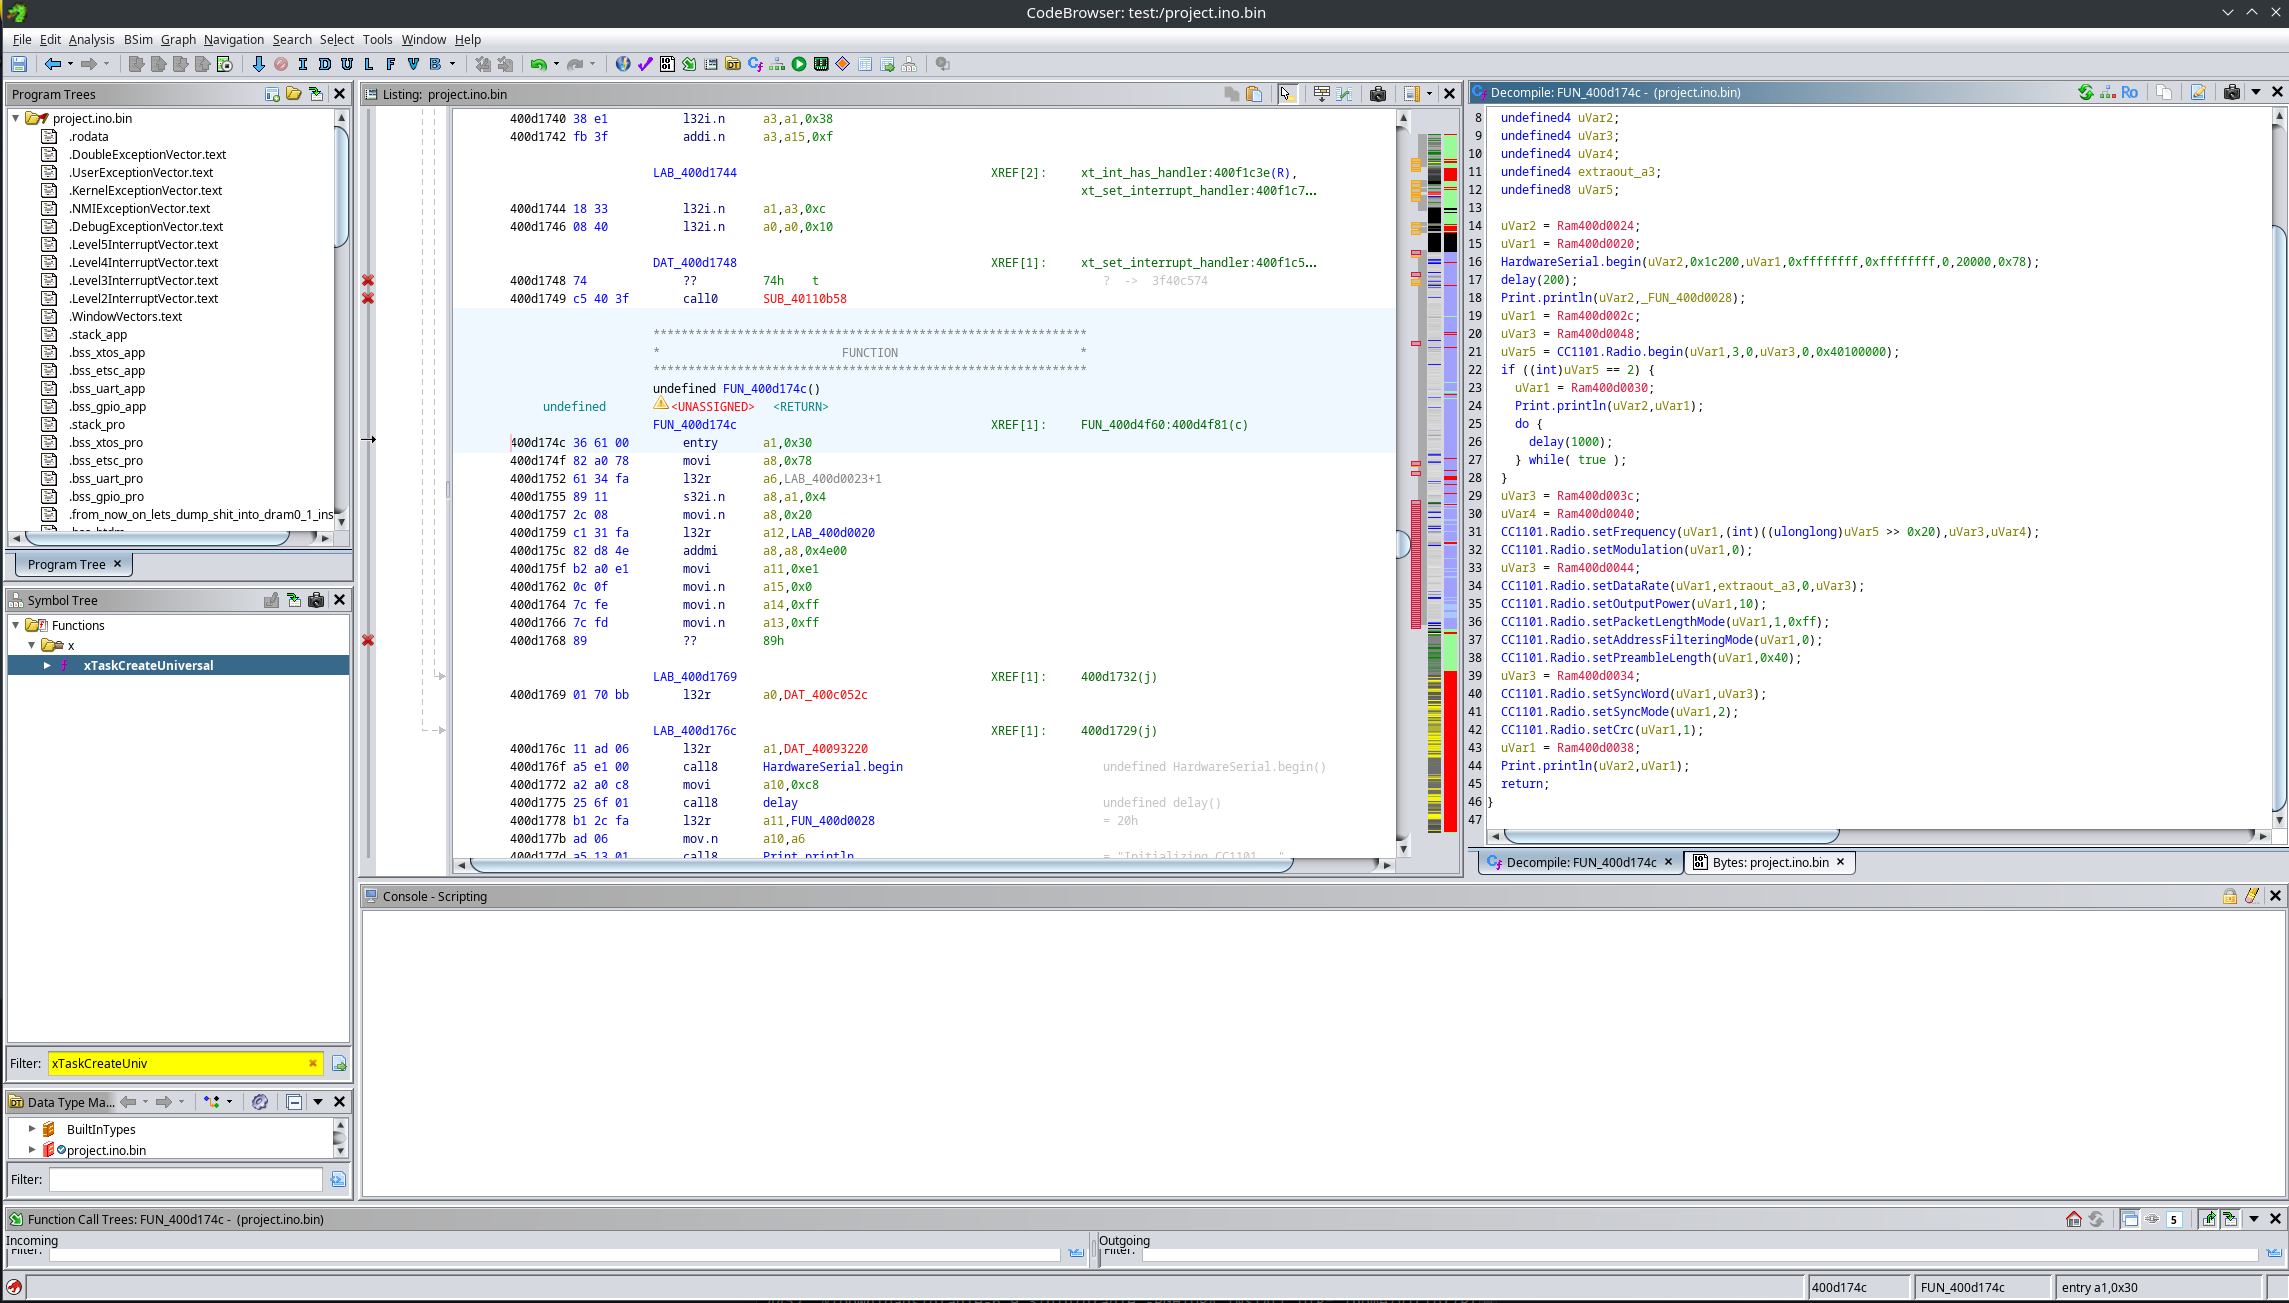
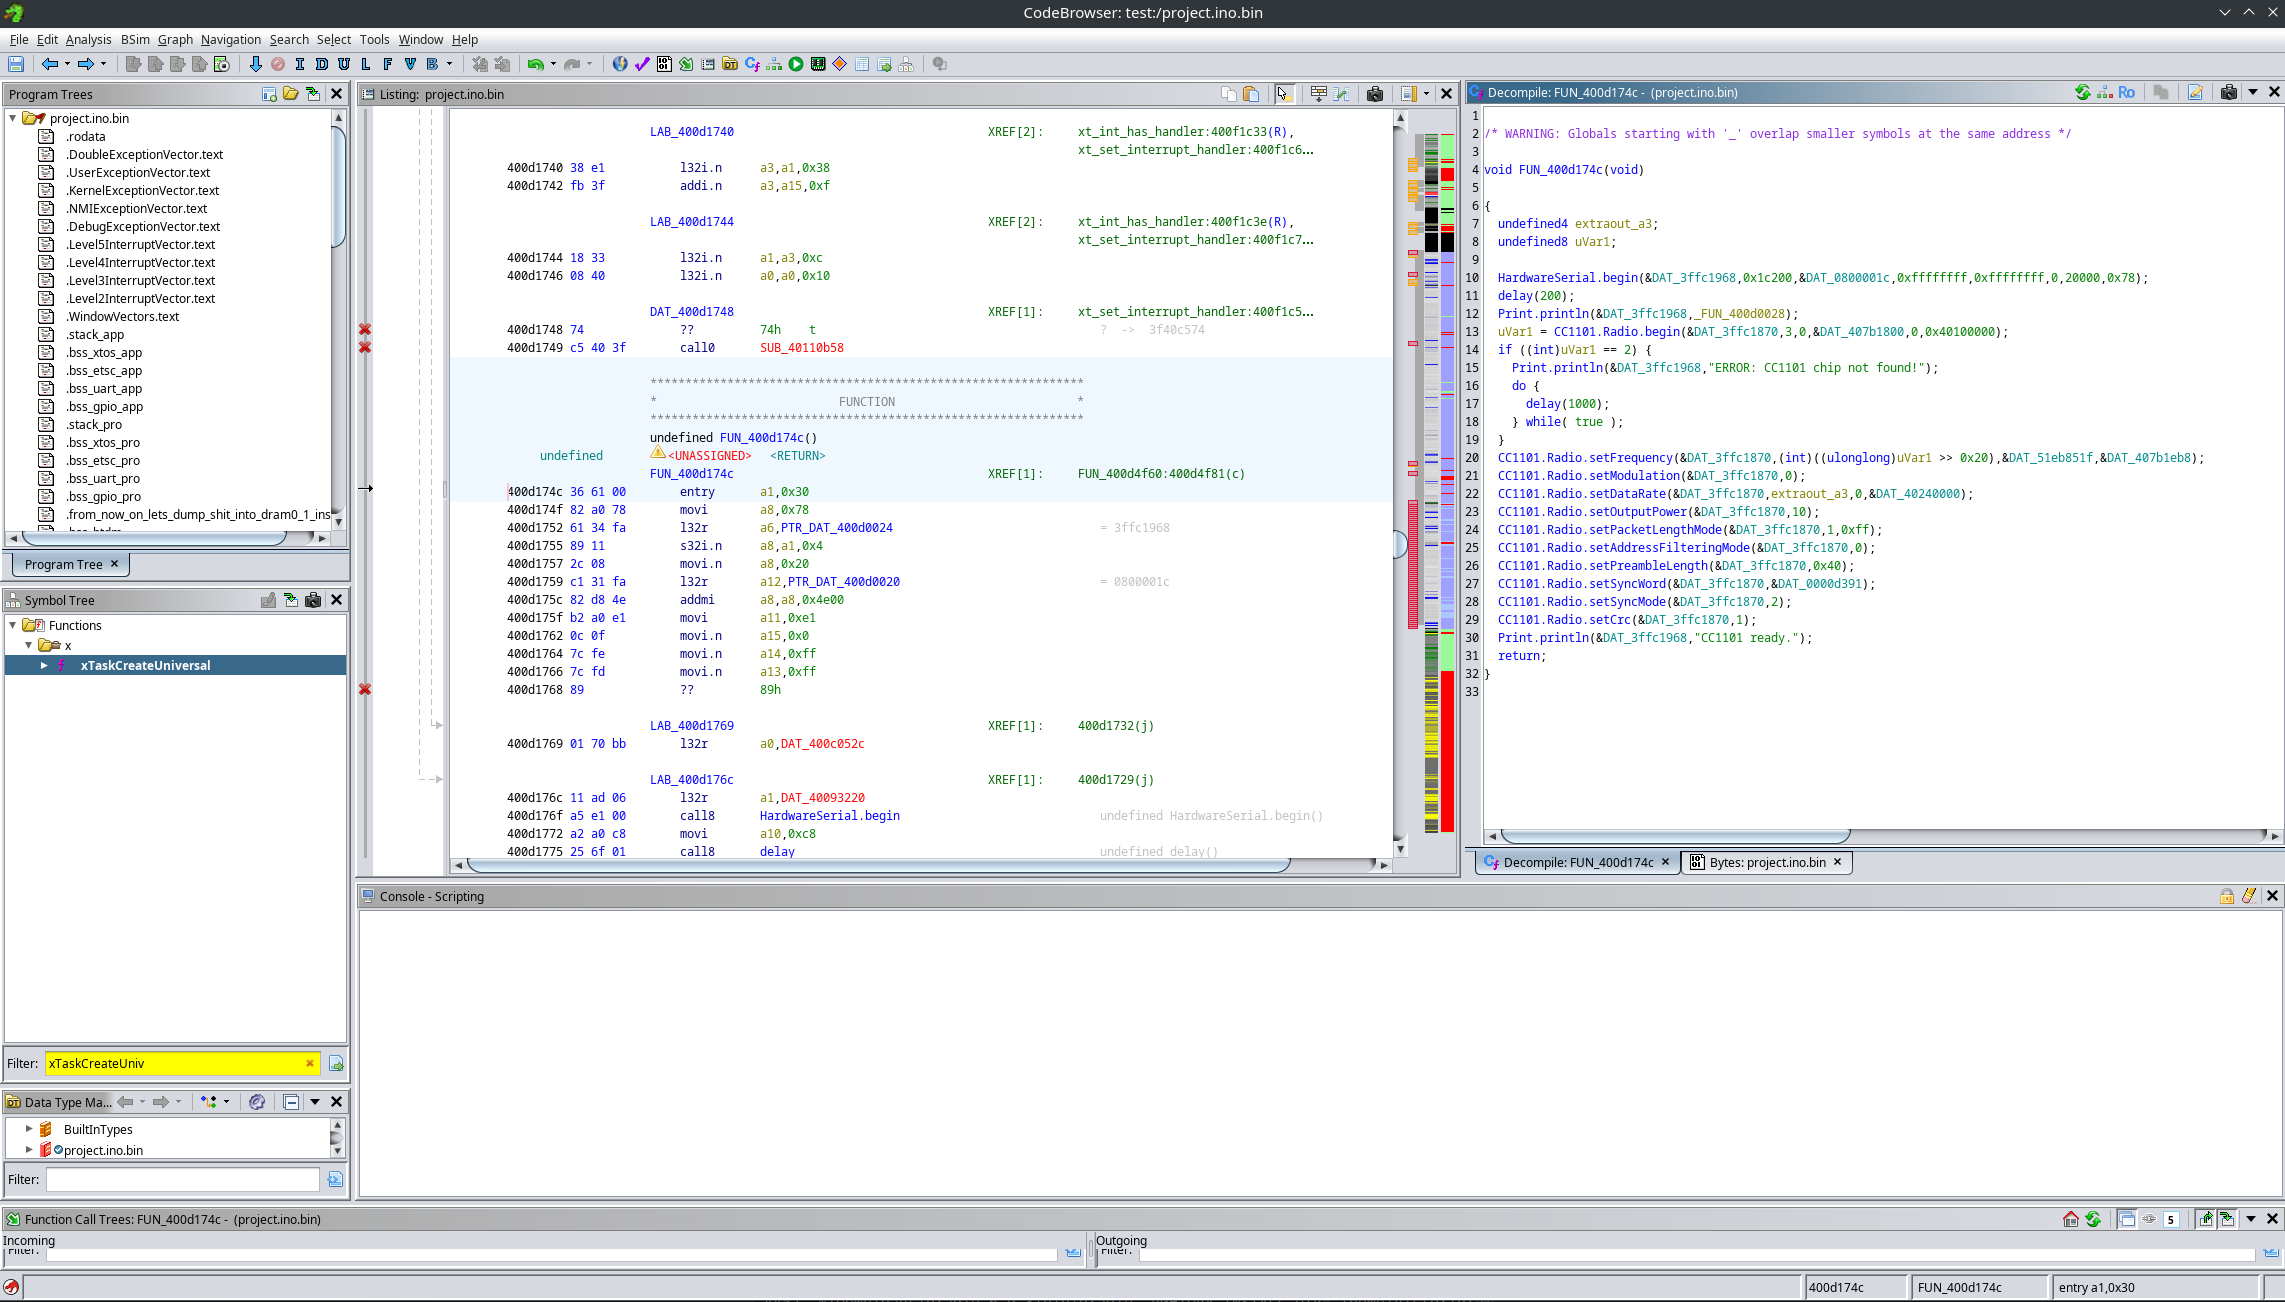
For example, here is the setup() function.
Before fixing constants:
After fixing constants:
Conclusion
Reverse engineering an Arduino-based ESP32 firmware may look daunting at first, but with the right workflow it becomes quite manageable. The same approach scales well beyond the simple example shown here and can be applied to real-world ESP32 firmware when the source code is no longer available.
In the future, it could be interesting to write a custom Ghidra analyzer that automatically fixes up pointer types and avoids breaking function boundaries. But that’s a topic for another time.